
Measuring belt size the right way saves you time, money, and frustration. When the old belt number is unreadable, missing, or your machine setup has changed, you need a simple, reliable way to find the correct size.
This guide shows how to measure serpentine belts, V-belts, and timing belts using tools most people already have.
Why Measuring Belt Size Matters
Many off-road machines don’t match their parts books anymore.
Brackets, pulleys, or whole engines may have been changed in the field.
If you order from old specs, you might get a belt that looks right—but fails fast.
- Too long → slips and squeals
- Too short → overloads tensioners and bearings
Clear note: The correct belt is the one that fits your machine now—not years ago.
Step 1: Identify Your Belt Type
Different belt types need different measurements.
Make sure you know what kind of belt you have before you measure.
Serpentine Belt
A flat, ribbed belt that drives several accessories like the alternator, power steering pump, or fan.
You’ll need to measure:
- Length
- Rib count/profile (number of grooves)
V-Belt
You’ll need:
- Top width (section)
- Length (and which type—inside, outside, or effective length)
Timing Belt
A belt with teeth that controls crankshaft and camshaft timing.
You’ll need:
- Tooth count
- Pitch (distance between teeth)
- Width
Clear note: Never use a serpentine belt method for a timing belt—the tooth pitch makes all the difference.
Step 2: Gather Simple Tools
You don’t need fancy tools—just accurate ones:
- Flexible measuring tape (cloth tape works great)
- Caliper or ruler (for width and pitch)
- Marker or chalk
- String (for missing belts)
- Straightedge (for checking alignment)
- Phone camera (to record routing and markings)
“If you can’t repeat the measurement, you can’t trust it.”
Step 3: Choose What to Measure – Belt or Path
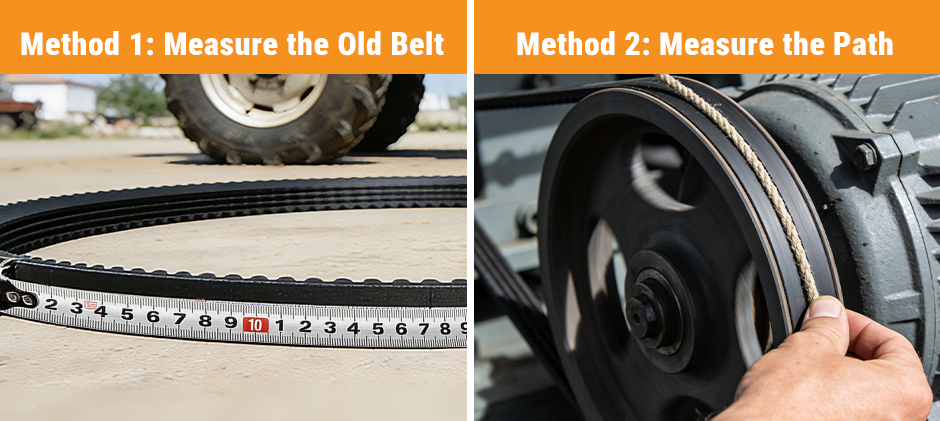
Measure the Old Belt
If the old belt is still close to its original size (not stretched or broken), use it.
Lay it flat and measure gently without pulling.
Measure the Belt Path
If the old belt is broken, missing, or questionable, measure the pulley path with a string or tape.
Follow the exact routing, mark where the string meets, and measure that length.
Clear note: A broken belt tells a story, but it’s not a good measuring tape.
Step 4: How to Measure a Serpentine Belt
Rib Count and Rib Profile
- Count the ribs (usually 4, 5, 6, 7, or 8).
- Measure the total ribbed width with a caliper.
Clear note: The rib count must match the pulley grooves exactly—one rib off is wrong.
Length – Three Simple Methods
- Read the Marking (if visible): Photograph any readable codes on the old belt.
- Measure the Belt Directly: Wrap a tape around the full circumference of the belt without stretching.
- Use a string to measure the Path: Wrap the string around the pulleys following the correct routing, mark it, and measure.
“String doesn’t lie—unless you route it wrong.”
Step 5: Check Tensioner Position
- Too long: tensioner sits near the limit → belt may slip
- Too short: adds pressure → may damage bearings
Step 6: How to Measure a V-Belt
Measure Belt Section (Width)
Use a caliper to measure the top width of the belt.
Common examples: A/13, B/17, etc. (these numbers vary by system).
Measure Belt Length
Belt length can mean different things depending on the reference:
- La: Outside length
- Li: Inside length
- Lp or Le: Pitch or effective length
Clear note: Two belts can share the same outside length but still be different types.
Avoid Stretching Errors
Measure naturally—don’t pull the tape tight. Record both width and length together so you don’t mix dimensions later.
Step 7: How to Measure a Timing Belt
Timing belts are tooth-based, not measured by circumference.
Count Teeth Properly
- Mark one tooth with chalk or paint.
- Count carefully all the way around.
Don’t guess—being “one or two teeth off” can cause major engine damage.
Measure Pitch and Width
- Pitch: Distance from one tooth center to the next. (For better accuracy, measure across 10 teeth and divide by 10.)
- Width: Measure with a caliper; must match pulley width and alignment.
Clear note: A wrong pitch belt will not mesh properly, even if it looks like it fits.
Step 8: Avoid These 7 Measuring Mistakes
- Measuring a stretched or deformed old belt
- Measuring the wrong routing
- Ignoring the tensioner position
- Mixing belt types (serpentine vs V-belt vs timing belt)
- Skipping rib/tooth count
- Confusing inside/outside/effective lengths
- Ignoring pulley wear and alignment
“A belt problem is often a pulley problem, wearing a belt as a symptom.”
Step 9: What Information to Collect Before Ordering
To get the correct belt quickly, write down or send this “belt ID bundle”:
- Machine make and model
- Engine model and serial number
- Belt type (serpentine / V / timing)
- Your measured dimensions
- Rib count, section width, or tooth details
- Photos of the routing or pulleys
Clear note: Clear photos plus correct measurements prevent wrong orders.
Summary
Measuring belt size comes down to knowing the belt type and using the right method:
| Belt Type | Key Measurements |
|---|---|
| Serpentine | Rib count + length |
| V-Belt | Top width + correct length reference |
| Timing Belt | Tooth count + pitch + width |
Always double-check tensioner travel, pulley condition, and alignment before putting your machine back to work.
For reliable replacement belts, turn to FridayParts and always match the belt to your current setup, not just the original spec. Measure carefully, confirm details—and your off-road machine will stay ready for the next job.