

Picture you turn the key on and your Ford tractor engine does not run. That’s probably a dead starter solenoid. But wiring your Ford starter solenoid wrongly can instantly fry your ignition syste. Don’t worry. Wiring a Ford 4-terminal solenoid is simple once you know the layout. In this guide, we’ll break down the wiring diagram step-by-step so you can get your tractor started safely and reliably.
Understanding the Ford Starter Solenoid Wiring Diagram
Before we begin the starter wiring process, let’s understand the layout of the Ford 4-terminal solenoid first (See picture below).
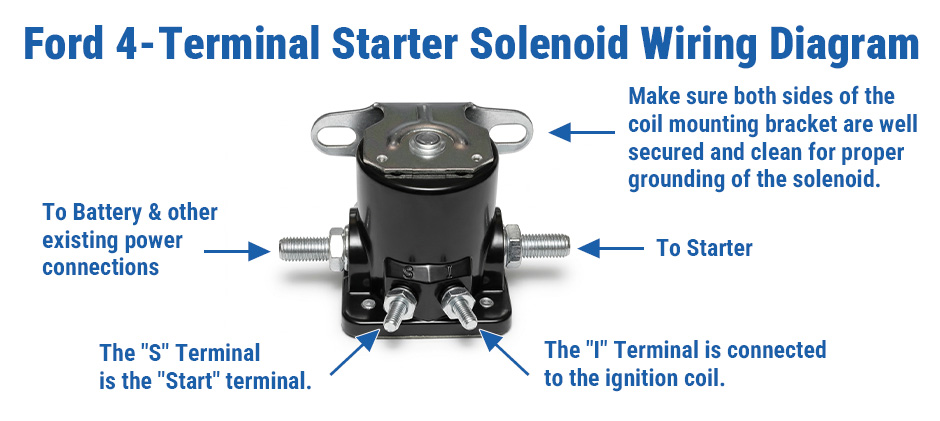
This starter solenoid acts as a heavy-duty switch controlled by a low-current circuit. It features two large copper posts for high-current power transfer, and two smaller threaded terminals for control and ignition assistance. The solenoid itself is grounded through its metal mounting bracket. Here is a detailed breakdown of each terminal and where its wire goes:
- Battery Terminal (Left Large Post): Connects directly to the positive (+) terminal of the battery. This is the constant 12V power input. Other major electrical loads of the vehicle (such as the “B” terminal of the ignition switch and the alternator/regulator) also draw power from this post.
- Starter Terminal (Right Large Post): Connects directly to the starting motor. It only delivers high-amperage current to the starter motor at the exact moment of starting.
- “S” Terminal ( Small Left Post): Connects to the “Start” position of the ignition switch, usually with a safety starter switch (neutral safety switch) wired in series. It receives a 12V signal when the key is turned to the “START” position, which energizes the internal coil to activate the solenoid.
- “I” Terminal (Small Right Terminal): Connects to the positive (+) side of the ignition coil. During starting, it momentarily bypasses the ignition resistor to send a full 12V to the ignition coil, providing a hotter spark for easier cold starts.
Ford Tractor Wiring Diagram (2000, 3000, 4000 Series)
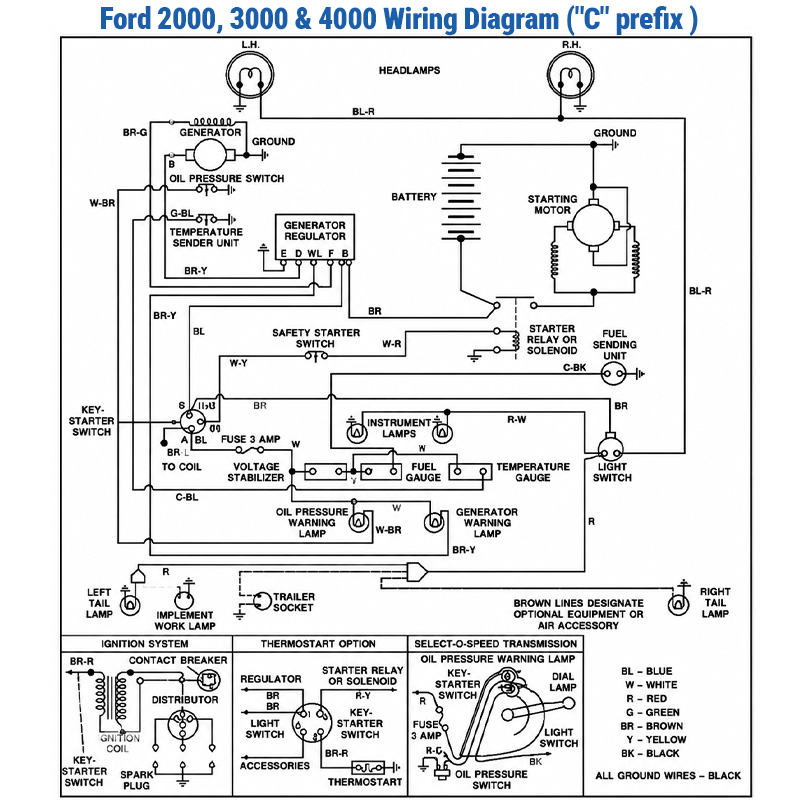
To ensure you use the correct wiring diagram for your tractor, you must first check your Ford tractor’s serial number prefix. The official Ford service manual provides two different schematics:
For all models with a “C” prefix to the tractor serial number (typically US-built models)
For all models with an “A” or “B” prefix to the tractor serial number (typically European-built models)
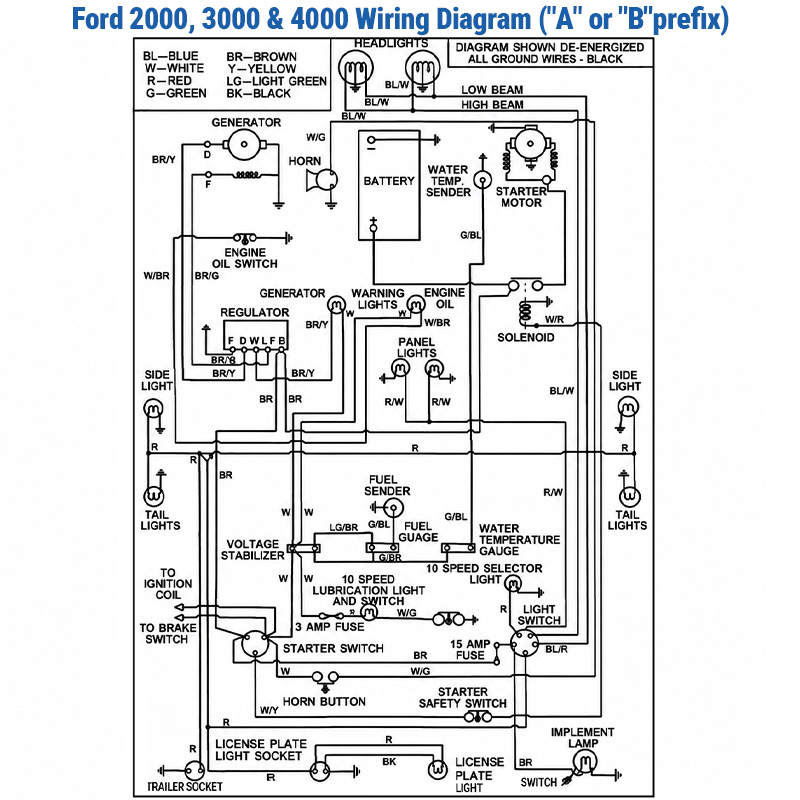
Regardless of your tractor’s model, the wiring principles for the starter solenoid remain the same: the battery terminal always connects directly to the positive (+) terminal of the battery; the starter terminal always connects directly to the starter motor; and the “S” terminal always connects to the ignition switch via the safety starter switch (neutral safety switch).
How to Wire the Starter Solenoid on Your Ford Tractor?
Follow these clear, step-by-step instructions to safely and correctly wire your Ford 4-terminal starter solenoid.
Safety First
Before performing any electrical work on your tractor, always disconnect the negative (–) battery cable first to prevent accidental short circuits, sparks, or damage to your electrical components while you work.
Mounting & Grounding
Bolt the solenoid securely to the tractor’s metal firewall or chassis. The starter solenoid does not have a dedicated ground wire; it grounds itself through its metal mounting bracket. Ensure the mounting surface on the tractor is clean, free of paint, rust, or dirt. If necessary, scrape away a small patch of paint to guarantee a solid metal-to-metal contact. A poor ground is the number one cause of solenoid failure!
Connect the Battery Positive
Run a heavy-gauge battery cable from the positive (+) terminal of the battery to the large left post on the solenoid. If you have other main power feed wires (such as the power supply to the ignition switch “B” terminal or the alternator regulator), connect them to this same left post.
Connect the Starter Motor
Run another heavy-gauge cable from the right large post of the solenoid directly to the terminal on the starter motor. This cable will only carry power when the engine is actively cranking.
Connect the “S” Control Terminal
Connect the thin control wire coming from the safety starter switch (neutral safety switch) to the small left “S” terminal. When you turn the ignition key to the “START” position, 12V travels through the safety switch (if the tractor is in neutral) and reaches this terminal, energizing the internal coil to close the heavy-duty switch inside.
Connect the “I” Ignition Terminal
For gasoline engines, connect a thin wire from this small right “I” terminal directly to the positive (+) side of the ignition coil. For diesel engines, leave this terminal completely disconnected (blank). Diesel engines do not use an ignition coil, so this terminal is not needed.
Reconnect and Test
Double-check all connections to ensure they are tight and properly insulated. Once verified, reconnect the negative (–) battery cable to the battery. Put the tractor in neutral, sit on the seat, and turn the key to “START” to test your newly wired system!

3 Pole vs 4 Pole Starter Solenoids
Many older Ford tractors are originally equipped with a 3-terminal solenoid. If you are looking at your old solenoid and replacing it, here is what you need to know:
The difference is that a 3-terminal solenoid only has the two large posts (Battery and Starter) and one single small terminal (the “S” terminal). It completely lacks the “I” terminal.
If you purchased a newer 4-terminal solenoid to replace your old 3-terminal unit, don’t worry. Simply wire up the Battery, Starter, and “S” terminals as normal, and leave the “I” terminal completely empty (disconnected). The solenoid will function well as a 3-terminal replacement. See 3 Pole vs. 4 Pole Starter Solenoid Wiring Diagram here.
Troubleshooting Tips
If your Ford tractor fails to start after wiring, use this troubleshooting guide to diagnose and fix the issue quickly:
| Symptom |
Possible Cause
|
Solution |
|---|---|---|
| No sound or reaction when turning the key (No “click” sound) | 1. Poor solenoid grounding via the bracket.
2. Safety starter switch is open (tractor not in neutral). 3. Faulty ignition switch. |
1. Clean the mounting bracket and chassis contact surface to bare metal.
2. Double-check that the gear shift is firmly in neutral. 3. Use a multimeter to check for 12V at the “S” terminal when the key is turned to “START”. |
| A clicking sound is heard, but the starter motor does not turn | 1. Low battery charge or weak voltage.
2. Corroded or burnt internal contacts inside the solenoid. 3. Faulty starter motor |
1. Test the battery voltage (should be 12.6V or higher).
2. Test bypass: Carefully bridge the two large posts with a heavy insulated screwdriver or jumper cable (expect sparks!). If the starter spins, the solenoid is defective and must be replaced. See How to Jump a Starter Solenoid here. |
| Starter motor keeps spinning and won’t stop (Stuck) | 1. Internal contacts inside the solenoid have welded/fused together. | 1. Immediately disconnect the negative (-) battery cable to prevent damage or fire, then replace the solenoid. |

Conclusion
Wiring a Ford starter solenoid doesn’t have to be intimidating. By following the 4-terminal layout and ensuring a solid metal-to-metal ground, you can easily eliminate that frustrating “clicking” sound and get your tractor cranking smoothly again. If your troubleshooting reveals that your old solenoid is completely dead, explore FridayParts to find quality replacement starter solenoids and other Ford aftermarket parts for your tractor. Shop Ford Tractor Parts at FridayParts today and get your machine back to the field with confidence.
