
Finding the correct Craftsman lawn mower belt diagram to get your machine back in action. This guide will provide you with clear diagrams and instructions to help you complete the replacement yourself.
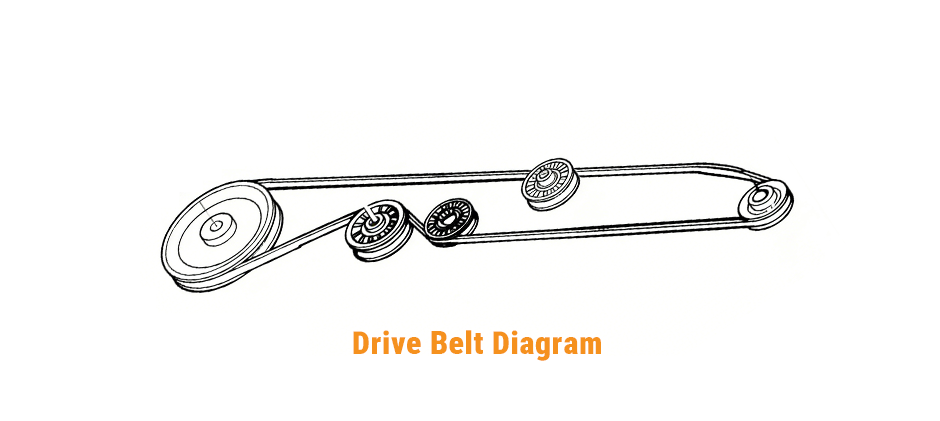
Craftsman Riding Mower Drive Belt Diagram
The drive belt connects the power from your engine to the transmission (or transaxle), allowing the wheels to turn. Note, for the Craftsman machine, the drive belt system is usually the same regardless of the cutting deck size. This means a 42-inch Craftsman riding mower drive belt diagram is the same for a 46-inch model. The diagram below shows a common drive belt diagram.
How to Replace the Drive Belt?
Park your mower on a flat spot, set the parking brake, and disconnect the spark plug wire. Before you take off the old belt, snap a few photos of its path from different angles with your phone. This visual reference will save you a ton of time when you put the new one on.
Belt Removal
- Take off the mower deck: You need full access to the bottom of the tractor. Follow your owner’s manual to unhook and slide the deck out from under the machine.
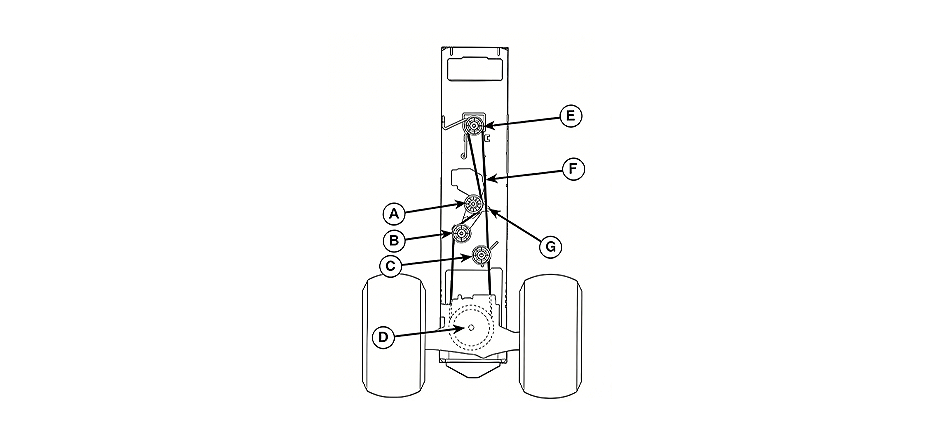
- Release tension: Gently slip the old belt off the fixed idler pulley (A) and the main clutch idler pulley (B). This will loosen the whole system.
- Take it off the idlers: Pull the belt off the centerspan idler (C).
- Remove from the engine pulley: Slide the belt forward and work it off the engine pulley (E) at the front of the tractor.
- Remove from the transmission pulley: Pull the slack toward the back of the machine. This is the trickiest part—carefully guide the belt up and over the transmission cooling fan blades (D) and off the input pulley.
- Pull the belt out: Once the belt is free from all pulleys, slide it off the steering plate (F) and take it completely out.
Belt Installation
- Pull the belt out: Once the belt is free from all pulleys, slide it off the steering plate (F) and take it completely out of the tractor.
- Route the new belt: Sliding the new belt from the back to the front, making sure it goes over the steering plate (F) and above the clutch/brake pedal shaft (G).
- Put it on the engine pulley: Pull the belt forward and roll it into the groove on the engine pulley (E).
- Put it on the transmission pulley: Pull the belt toward the back. Gently work it down around the transmission cooling fan (D) and onto the input pulley. The belt sits right inside the belt keeper guides.
- Thread through the idlers: Put the belt on the centerspan idler (C), then run it through the fixed idler (A) and the clutch idler (B).
- Final check: Spin the pulleys by hand to make sure the belt is seated properly in every groove, and moves inside all the metal belt guides/keepers. These keepers stop the belt from jumping off mid-use.
- Put the mower deck back on: Carefully slide the deck back and reattach it.
Craftsman Riding Mower Deck Belt Diagram
The blade belt takes power from the engine to the blades on the mower deck, making them spin fast for cutting.
Unlike the drive belt, the deck belt route is almost always different for different deck sizes — it all depends on how the deck is designed.
- Number of blades: A 42-inch deck normally has 2 blades, while 48-inch and 54-inch decks usually have 3. More blades mean more pulleys the belt has to go around.
- Spindle spacing: Bigger decks have spindles spaced farther apart, which changes how the belt fits and runs.
- Idler pulleys: Different numbers or types of idler pulleys to keep the belt tight and guide it along the right path.
Craftsman 42 Inch Mower Deck Belt Diagram
The 42-inch deck is one of the most popular sizes, especially on the Craftsman LT1000. This is a classic Craftsman LT1000 deck belt setup with two blades. The belt loops around the two-blade pulleys and is held tight by idler pulleys.
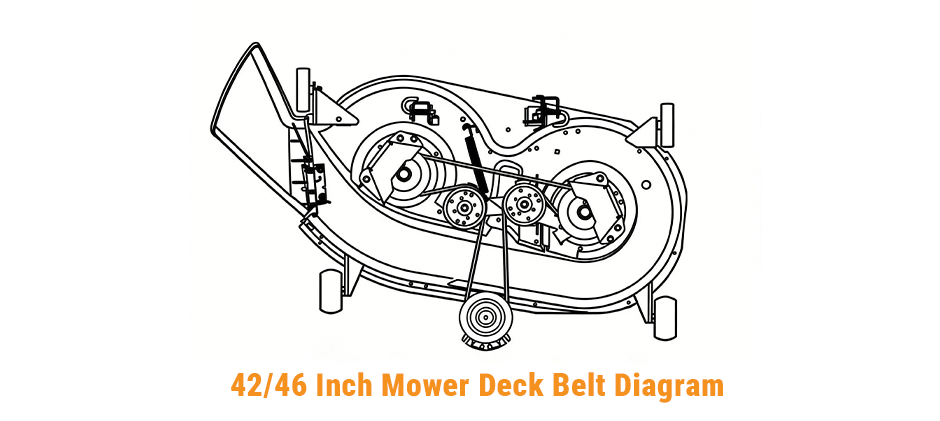
One important, the V-shaped side of the belt must fit down into the V‑grooves of the blade pulleys. The flat back side of the belt should rest against the flat idler pulleys.
Craftsman 46 Inch Mower Deck Belt Diagram
Many modern Craftsman mowers ( especially those built by MTD with model numbers starting with 247.xxxxxx) use the same belt routing for both 42-inch and 46-inch decks.
This is thanks to modular design. The idler pulleys and spindles are laid out the same way; the 46-inch deck is just wider, with spindles spaced further apart.
But the belt path is the same, the belt itself is not. A 46-inch deck needs a longer belt than a 42-inch deck. Do not use one in place of the other.
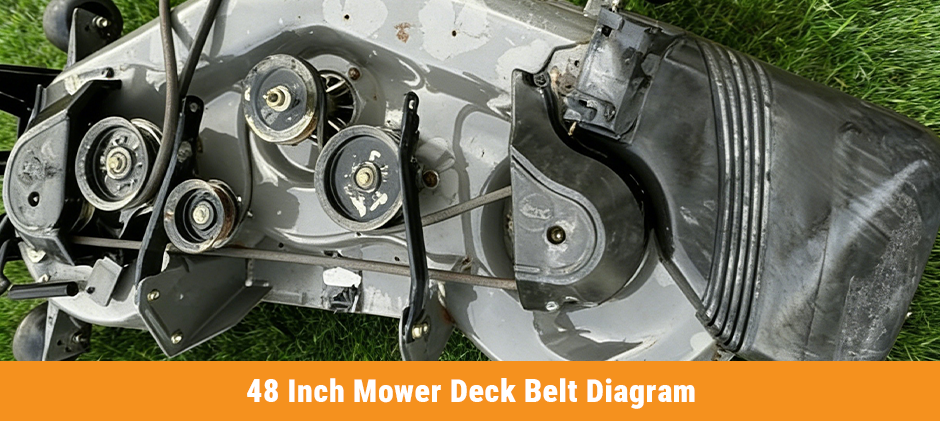
Craftsman 48 Inch Mower Deck Belt Diagram
Once you step up to a 48-inch mower deck, the design changes a lot. These almost always come with three blades. With an extra blade, the belt has to drive three spindle pulleys, so the path gets a lot more complicated.
The belt no longer just loops around simply — it has to wind around more pulleys. Extra idlers are often added to change direction, keep the belt tight, and let it run smoothly over the longer distance.
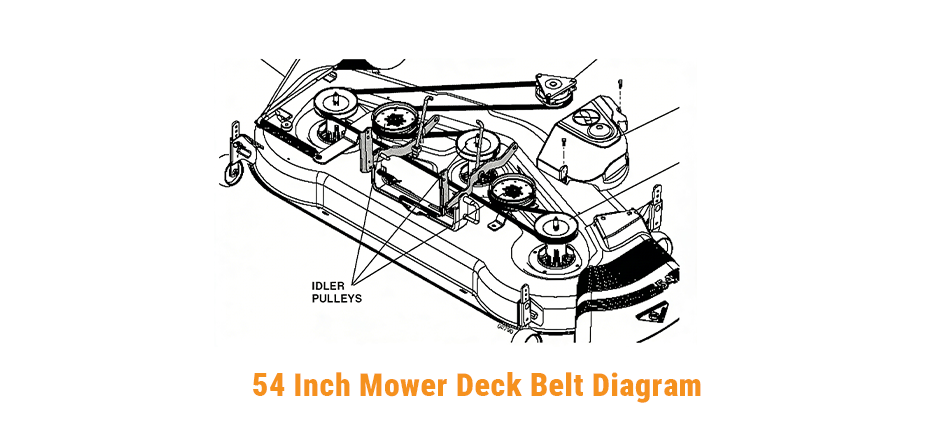
Craftsman 54 Inch Mower Deck Belt Diagram
A 54-inch mower deck also uses three blades, and it’s one of the biggest residential mower decks you’ll find. Since it’s larger, the belt has to travel a longer distance, and its path is more complex than on a 48-inch deck.
That means belt tension is extra important — it can’t be too loose or too tight. To keep it running steady, the idler pulleys are usually built stronger to handle the extra pull and stress during use.
How to Replace the Deck Belt?
Changing the deck belt on your lawn mower isn’t that difficult, it’s better than a drive belt because the position is easier to reach. Park the machine on flat ground, apply the parking brake, and unplug the spark plug wire to avoid accidental start.
- Then lower the mowing deck to its lowest setting so the belt is a little looser.
- Next find the idler pulley with the spring and use a wrench (some are 3/8 or 1/2 sockets) to move it and release the belt tension.
- Take the old belt off the pulley on the engine side and slowly remove it from the other pulleys and spindle pulleys. Note the small belt keepers that secure the belt and don’t miss them.
- When installing a new belt, follow the original routing step by step, and finally go around the idler pulley.
- After installing, slowly release the wrench to restore tension to the spring.
- Make sure the belt is seated properly in each pulley groove and not installed crooked.
How to Find the Correct Belt Diagram?
If you’re not sure, don’t guess. Here’s how to find the right belt diagram for your mower:
- Check the sticker on the deck: Many Craftsman mowers have a label right on the deck that shows how the belt should run. If it’s clean and readable, this is the fastest way.
- Check your owner’s manual: The manual is the most reliable source. It has exact diagrams for your model, for both the deck belt and drive belt.
- Use your model number: This is the most accurate way. Look for the model number plate under your seat. Most start with 917.xxxxxx (older Husqvarna models) or 247.xxxxxx (newer MTD models). Type this full number into a parts website like Sears PartsDirect, and you’ll get the exact belt diagram for your mower.
Conclusion
By knowing the difference between drive and deck belts, knowing how deck size impacts the routing, and following the correct replacement procedures, you can tackle this common maintenance task.
FridayParts is dedicated to providing premium aftermarket Craftsman parts, from belts to blades to spindles. Don’t let a broken belt stop you—find your durable replacement part today.