

When an alternator isn’t charging, the alternator itself is rarely the first thing to blame. On off-road machinery, the fault is usually in the belt, the cables, the grounds, or the battery — parts that vibration, heat, and dust wear down long before the alternator itself gives up. A new unit fitted to a machine with a corroded ground strap will fail the same way within days. Here’s the fault list, the best order to check them, and when replacing is the smarter call.
What Causes an Alternator Not to Charge?
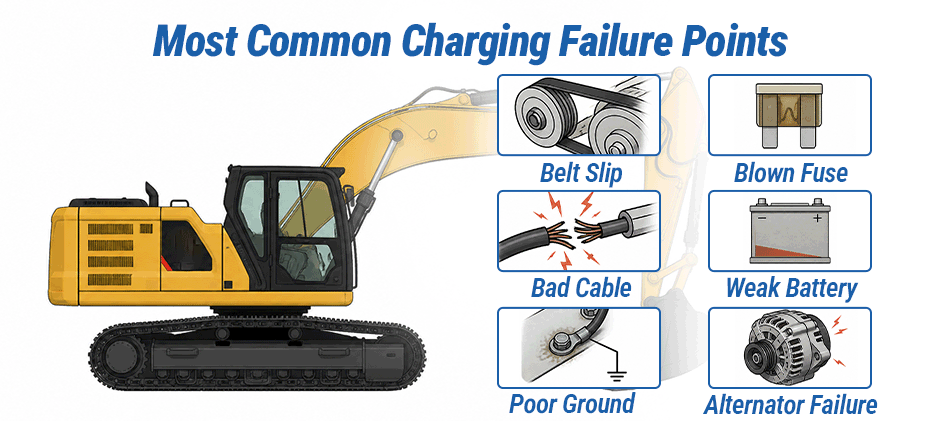
Charging problems rarely start inside the alternator itself. On off-road machinery, vibration, dust, moisture, and heat take a toll on the whole system—and the weakest link usually shows up first.
- Check the belt and battery terminals first. These two account for the majority of charging complaints. A belt that looks fine cold can slip badly once the engine warms up and the pulley expands. Corroded or loose battery terminals? Nine times out of ten, they get blamed on a bad alternator when a wire brush and five minutes would fix it.
- Grounds get overlooked. The alternator case, engine block, frame, and battery negative all need a clean, solid path. Too much resistance here makes a perfectly good alternator look weak. On older machines, ground straps corrode internally—they look intact but drop voltage under load.
- Fuses and fusible links are quick to check and quick to rule out. If one is blown, something caused it. Don’t just replace it and move on.
- The alternator and regulator are further down the list. A failed diode pack, worn stator, or faulty regulator does happen—but not as often as bad connections or belt issues. And a weak battery with an internal fault can mimic any of these symptoms and send you down the wrong path entirely.
Quick Fault Guide:
| Symptom | Most Likely Area to Check First |
|---|---|
| Battery keeps going dead | Charging output or battery condition |
| Charges only at high RPM | Belt slip, idle speed, weak low-speed output |
| New unit still does not charge | Fuse, exciter circuit, cable, ground |
| Voltage good at alternator but low at battery | Charge cable or connection resistance |
| Charging drops with work lights on | Weak alternator, slipping belt, high resistance path |
These faults are common because the charging system works as a chain. Once one link weakens, output drops, and the machine starts showing low-voltage symptoms.
Why Alternator Not Charge at Idle Happen?
If charging returns at higher engine speed but drops at low speed, the cause is still usually within the same system. This is why the idle complaint belongs under causes, not as a separate main section.
Common reasons include:
- Idle speed is too low for stable alternator output
- The belt slips more easily at low RPM
- Electrical load is too high at idle
- Cable or ground resistance becomes more obvious when output margin is small
- The alternator is weak and cannot support low-speed charging
This pattern matters on off-road machinery that spends long periods idling with work lights, cab blowers, monitors, and control circuits active. In that situation, a marginal charging system may seem normal at operating speed but fail at idle.
If a machine only charges above idle, do not assume the alternator is fully healthy. Low-speed output problems often point to belt, wiring, or internal wear.
Step-by-Step Charging System Diagnosis
A charging problem should be checked in order. That helps avoid replacing parts based on guesswork.
1. Start with a visual inspection
Before using a meter, inspect the basic items:
- Belt condition and tension
- Alternator mounting security
- Battery terminal corrosion
- Charge cable damage
- Ground strap condition
- Connector fit at the alternator
- Main fuse or fusible link
On off-road machinery, physical inspection matters because dust, vibration, and moisture often create faults that do not show up in a quick bench test.
If belt wear, cable damage, or weak grounding is found, this is the natural stage to inspect or replace related parts such as a battery cable, ground strap, or belt tensioner.
2. Check battery voltage with the engine off
A weak battery can confuse the diagnosis. Check resting voltage before running any charging test.
As a general guide:
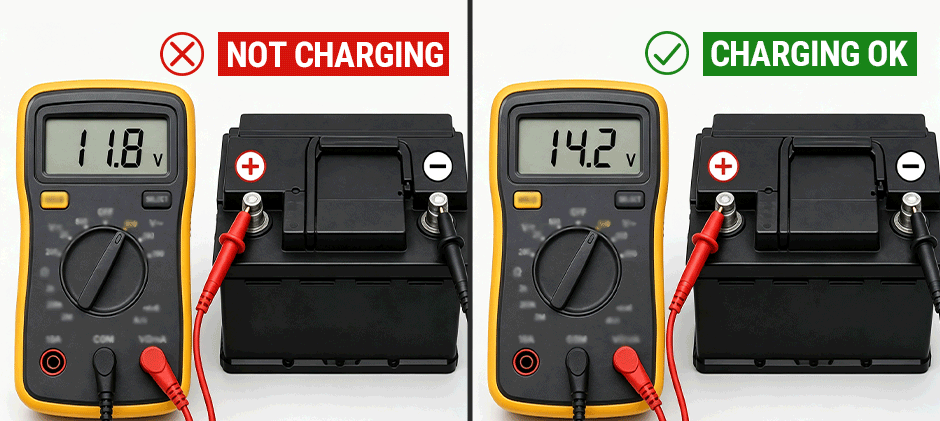
- Around 12.6V means a fully charged 12V battery at rest
- A much lower reading means the battery may need charging or further testing first
If the battery is heavily discharged, recharge it before concluding the charging system.
3. Check voltage with the engine running
Next, compare battery voltage with the engine running.
- If voltage rises clearly above the resting level, the alternator is charging at least to some degree
- If voltage does not rise enough, the alternator not charging complaint is likely real
This is one of the fastest ways to confirm whether the machine has a charging problem or only a battery condition problem.
4. Measure voltage at the alternator output terminal
This step separates alternator failure from wiring loss.
- If voltage is good at the alternator but low at the battery, the problem is likely in the cable, fuse, or connection path
- If voltage is low at the alternator itself, the alternator or regulator becomes the main suspect
This matters because many cases of an alternator not charging the battery, even when the alternator is good, stem from output loss between the unit and the battery.
5. Perform a voltage drop test
A continuity check alone is not enough. A cable may pass continuity and still fail under load.
Test for voltage drop on:
- The positive side, from alternator output to battery positive
- The ground side, from alternator case to battery negative
A high voltage drop means resistance is robbing charging performance. This is common on hard-worked machinery with aged cables and exposed grounding points.
6. Check the field or exciter circuit
If a replacement unit has been fitted but the problem remains, check whether the alternator is receiving the signal it needs to begin charging.
A missing field or ignition signal can cause a “new part, same problem” result. That is a common reason for complaints about a new alternator not charging.
7. Recheck under real operating load
Once basic voltage tests are done, recheck the machine with real electrical loads applied.
Turn on the loads normally used during operation, such as:
- Work lights
- Cab fan
- Display or monitor circuits
- Warning system loads
If charging falls off only under load, the problem may be a weak alternator, belt slip, or resistance in the circuit.
Repair or Replace? Practical Fixes That Work
Once the fault is confirmed, the next step is not only deciding whether to repair or replace. The real goal is to fix the charging path correctly so the problem does not return.
Fix belt-related charging problems first
If inspection shows slipping, glazing, cracking, or poor tension, correct that before replacing electrical parts.
Typical actions include:
- Adjust belt tension to the correct range
- Replace a worn drive belt
- Inspect pulley alignment
- Check the belt tensioner if equipped
- Clean oil or coolant contamination from the belt path if the root leak has already been repaired
Repair cable and ground resistance
If voltage is present at the alternator but not reaching the battery, the best fix is usually in the wiring path.
Use these steps:
- Remove and clean corroded battery terminals
- Tighten loose eyelets and connection points
- Replace heat-damaged or stiff charge cables
- Clean paint, rust, or corrosion from grounding surfaces
- Replace a damaged ground strap or battery cable if resistance remains high
Replace blown protection parts with the correct rating
If the charging fuse or fusible link is open, replace it only after checking why it failed.
Do not stop at the fuse alone. Also inspect:
- Charge wire for shorts or rubbing damage
- Connector pins for heat damage
- Alternator output stud for looseness
- Battery polarity history if recent service was done
Repair or replace the regulator or alternator
If testing shows low output directly at the alternator, internal failure becomes the main suspect.
At that point, there are two practical options:
- Replace the regulator if the design allows service and the rest of the unit is in good condition
- Replace the complete alternator if internal wear, bearing noise, heat damage, or unstable output is present
How to replace the alternator the right way?
When replacement is needed, the job should not begin and end with swapping the unit.
A better process is:
- Disconnect battery power before removal
- Compare mounting points, pulley type, wiring plug, and output terminal position
- Inspect the charge cable and connector before fitting the new unit
- Install and torque the unit securely
- Fit or adjust the belt correctly
- Reconnect wiring and confirm clean terminal contact
- Start the engine and test charging voltage again
- Recheck voltage under electrical load
Bottom Line
Most charging failures come from wiring, belts, or grounding—not the alternator itself. A systematic test sequence prevents unnecessary alternator swaps and reduces downtime. When replacement is confirmed, FridayParts delivers quality aftermarket alternators and charging components for heavy equipment—backed by practical support to get the right part fitted right the first time.
