

The decal under your hood is the only 5.9 Cummins belt diagram that’s guaranteed to be right for your truck. A decade of heat cycles and a few pressure washes turn it into a blank rectangle. Then it comes down to a new belt in hand and no routing to follow. We cover the 5.9 Cummins belt path for every engine stage Dodge produced from 1989 through 2007, along with the tensioner tool matched to each one, the release direction, and the part numbers that cross-reference reliably. All of that is below. Where the factory procedure shifts by build date, this guide says so instead of pretending one chart fits every truck.
5.9 Cummins Belt Diagram by Year
Four stages. Within each one, an A/C truck can run a different path than a non-A/C truck, so match the engine before you match the pulley layout.
1989-1993: Bosch VE, first generation
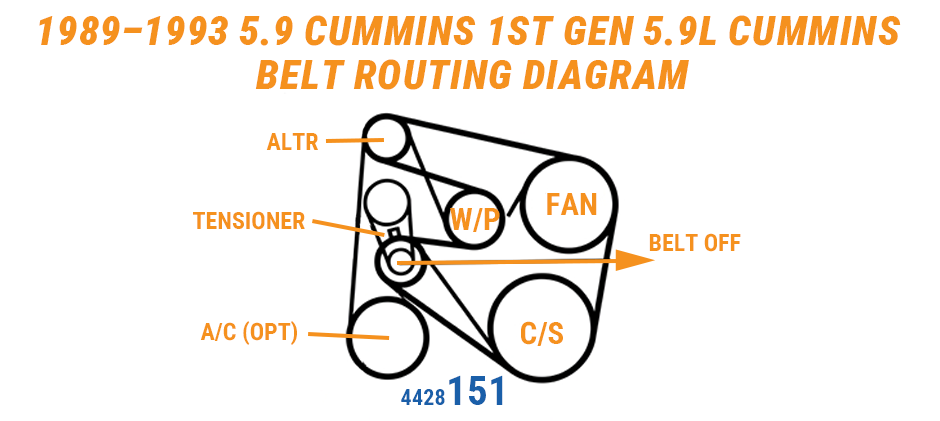
First-gens are the simplest of the four to work on and the most annoying to buy parts for.
The Bosch VE trucks run one multi-rib belt around the crank, water pump, alternator, and, if the truck has air, the compressor. Non-A/C builds use a shorter loop that skips the compressor pulley entirely. Same engine bay, two different belts.
Ordering is where first-gen owners get burned. Dodge varied A/C configurations by build date, occasionally mid-year, and the length charts floating around online don’t survive that. Measure the belt in your hand. A tape run around the old belt beats any lookup table, and a VIN check at the counter beats both.
Tensioner drive size and release direction are worth checking on the part itself. Find the cast arrow, find the square-drive opening, then read the service manual for your model year before you put a bar on it.
1994-1998: the P-pump years
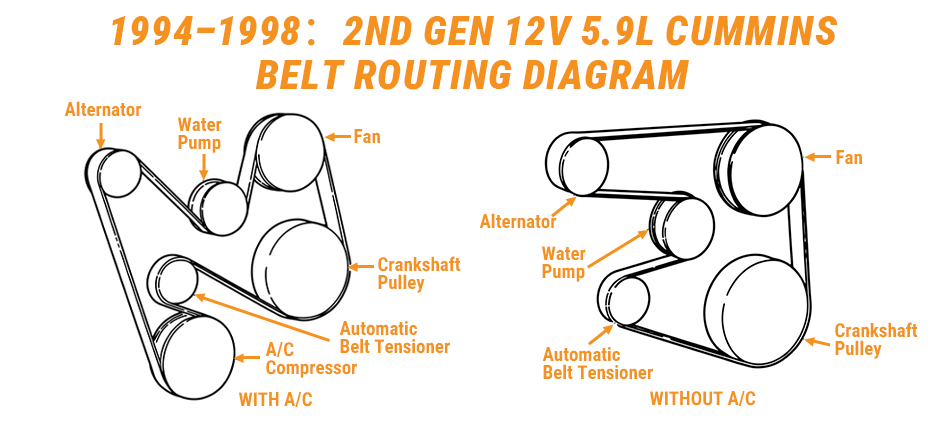
Second-gen bracket geometry changed with the body style, so a ’94 and a ’98 aren’t the same job even though both use a spring-loaded tensioner. The belt path covers the crank, water pump, fan hub, alternator, tensioner, and the compressor on A/C trucks.
Two lengths, two answers:
- A/C: the longer 8-rib belt, wide enough to wrap the compressor.
- No A/C: the shorter belt, run exactly as the factory decal shows.
If there’s one thing on this range I wouldn’t take from a forum post, it’s the tensioner tooling. Sizes and rotation directions get repeated from year to year and from truck to truck, and some of what circulates doesn’t match the factory procedure at all. Check the cast arrow on your own tensioner. Check the manual for your own model year. Then apply force.
A chirp at idle isn’t a belt diagnosis. It could be pulley alignment, a tired idler bearing, a tensioner that’s lost its preload, or coolant that found the ribs. Rule all four out before you spend money on the wrong part, and when you do buy, pick a belt from a brand with a reputation to protect rather than the cheapest 8-rib on the shelf.
1998.5-2002: VP44, 24-valve ISB
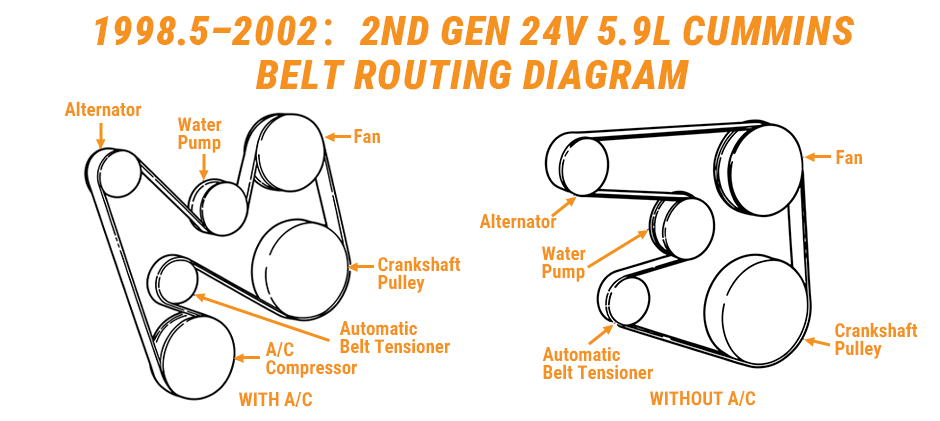
This is the awkward middle child. The 24-valve ISB with the VP44 pump sits between the P-pump trucks and the common rail, and its tensioner hardware doesn’t behave like either one. Drive size and release direction both move around by build.
So look before you lever:
- Cast arrow or spring-tang mark on the tensioner body, whichever yours has.
- A square-drive tool that seats all the way down. If it rocks in the opening, it’s the wrong size.
- The factory manual for that specific model year.
The 5.9 Cummins belt diagram here reads close to the P-pump trucks, with one difference that matters: the alternator bracket and fan hub were both revised. A correctly sized belt plus a hand-spin on the idler and tensioner clears up most of the noise complaints these trucks show up with.
2003-2007: common rail, least room
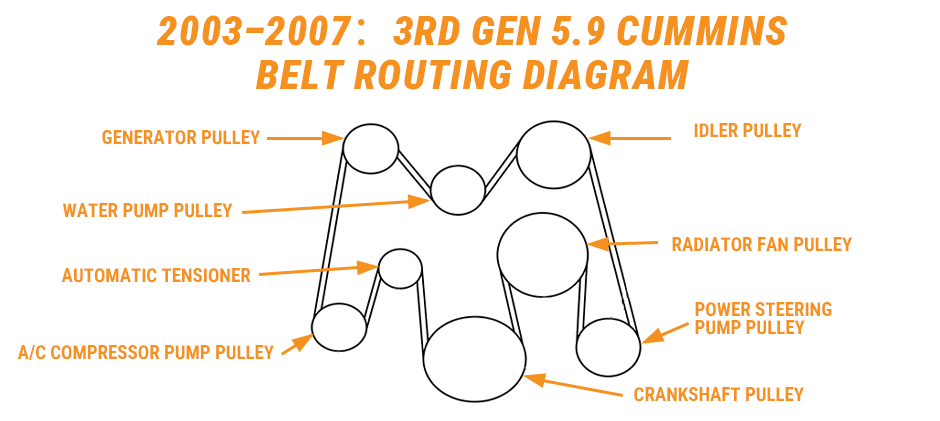
Clearance here is the tightest of the four stages, and the tensioner sits right where your knuckles want to be. Plan the path before you release spring tension, not after.
What the Dodge procedures document for several model years in this range:
- 1/2-inch square drive and clockwise release. Confirm both on your own tensioner before you lean on the bar.
- A/C trucks: roughly 126 to 127 inches, or 3200 to 3227 mm, 8-rib. Brand tolerances run about an inch, so don’t panic when the new belt and the old one don’t match exactly.
- Non-A/C trucks: about 110 inches, 2800 mm, 8-rib.
Working from underneath is easier on these. A long-handle 1/2-inch breaker bar gets you the swing without fighting the fan shroud.
Which tool, which direction
Wrong tool rounds the square drive. Wrong direction loads the spring instead of releasing it, and you find out when the bar kicks back at your wrist. Both mistakes are avoidable in about ten seconds of looking.
| Generation | Drive | Release | What to confirm |
|---|---|---|---|
| 1989-1993 12V | Not consistent across the run | Cast arrow | Size of the square-drive opening, and the factory procedure for that model year |
| 1994-1998 12V | Varies | Cast arrow, then the manual | Bracket changed with the body style, so a 1994 answer can be wrong for a 1998 |
| 1998.5-2002 24V ISB | Varies by build | Arrow or spring-tang mark | Tool sits flush, no wobble in the opening |
| 2003-2007 common rail | 1/2-inch square | Clockwise | Dodge procedure for that model year, plus the arrow on the casting |
Read the arrow stamped into the casting rather than the one you remember from a video. Beyond that, it’s mostly about fit: a tool that matches the drive you actually have, kept square to the opening while the spring is loaded. A cocked breaker bar is how the corners come off.
Sort the tool, and the 5.9 Cummins belt diagram becomes the easy half of the job.
How to Replace the Serpentine Belt
Engine cold. Fingers clear of the fan. Then:
- Photograph the routing before you touch anything. Four seconds now, saved aggravation later.
- Compare that photo to the belt diagram for your generation above.
- Seat the correct ratchet or breaker bar into the tensioner drive.
- Rotate the right way to unload the spring.
- Take the belt off in the order your manual gives for that model year.
- Spin every pulley by hand. Gritty or rough means that bearing is finished.
- Route the new belt in the sequence your 5.9 Cummins belt diagram shows.
On plenty of 2003-2007 common-rail trucks, the documented Dodge procedure runs the new belt over everything except the water pump, then rotates the tensioner clockwise and walks the belt onto the water pump pulley last. Some procedures in the same range leave the idler for last instead. Follow the one written for your model year, because the wrong order can turn the water pump backwards, and a water pump spinning backwards is an overheating engine roughly ten minutes into the drive.
Once the belt is on, hold tension, check that every rib sits in its groove, and let the tensioner back down slowly.
Before you turn the key, walk the whole path again. Every groove full. No tools left on the core support.
Follow your own truck’s procedure over any habit borrowed from a different model. The order on the decal and in the manual was written around the clearance on that specific accessory layout. If the routing matches the factory decal, it’s correct.
When the belt actually needs replacing
Dodge’s guidance for the 5.9 diesel is narrower than most owners assume:
- Cracks running lengthwise along a rib
- Exposed reinforcement cord, or chunks missing from the rib material
- Heavy glazing on the rib surface
- Uneven rib wear, or pieces of rib gone
Small cross-rib cracks on an older belt are normal and aren’t listed as a reason to replace on their own. Noise isn’t either. Chirps and squeals come from misalignment, worn idler or tensioner bearings, wrong tension, or contamination, and a new belt laid over a tired tensioner makes the same racket with less material left on your knuckles.
Spin the tensioner and idler while the belt is off. Rough bearings, or an arm that bounces under load, mean they come off with the belt. Buying both at once costs less than doing the job twice on a Saturday.
Part numbers, and when to stop reusing the old belt
Lengths below are approximate. Verify against the belt in your hand and the decal under the hood. Routing is the fun half of this job. Ordering is where people get stuck, so match the number to the belt you pulled rather than the year on the title.
| Years | Config | Reference |
|---|---|---|
| 1989-1993 | A/C and non-A/C | Decal plus VIN lookup. First-gen lengths vary by build date |
| 1994-1998 12V | With A/C | Mopar 53040171, cross-references to Dayco 5080810 / 8PK2055, about 81 inches |
| 1998.5-2002 24V | Both | VIN and decal. Measure the old belt before ordering |
| 2003-2007 | With A/C | Mopar 53041138AE, cross-references to Dayco 5081260 / 8PK3200, about 126 inches, or 3215 to 3227 mm on some brands |
| 2003-2007 | Non-A/C | Mopar 53041139AE, cross-references to Dayco 5081103 / 8PK2800, about 110 inches, or 2800 mm |
Part numbers don’t swap cleanly across every build date. Confirm fitment before you pay for anything.
On timing, your owner’s manual has the inspection schedule, and it’s worth following. Practically, look at the belt at every oil change and replace on condition rather than mileage. Lengthwise cracks, chunking, exposed cord, glazing, uneven ribs. Any one of those and the belt is done.
Where to get the parts
Get the truck matched to the right generation, verify the tensioner drive and release direction on the actual tensioner, and follow the factory install order for your model year. Do it right, and the belt goes on clean, the water pump spins the correct way, and the chirp from the old belt stays gone. For replacement belts, tensioners, and idler pulleys across the full 1989–2007 5.9L range, FridayParts carries aftermarket options at fair prices with fitment coverage for every generation above.
