

Getting the right Kohler valve clearance chart starts with identifying your exact engine, not just the brand on the shroud. Some models use standard lash settings. Others have hydraulic lifters and require a different procedure. This guide helps sort that out quickly and then shows how to find the true compression TDC before adjustment, which is often where a routine valve job goes off track.
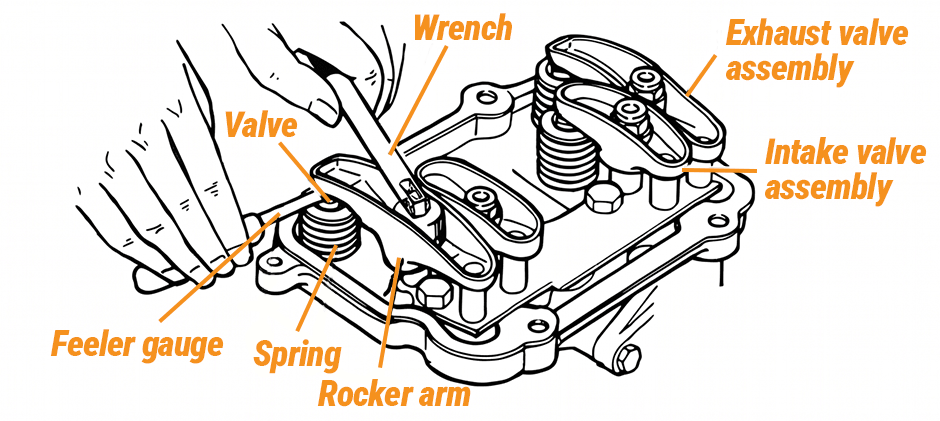
Kohler Valve Clearance Chart by Engine Series
The safest way to use any Kohler valve clearance chart is to first match the engine model and spec number. Kohler has used different valve systems across different engine families, so the correct clearance depends on more than just the brand name on the shroud.
To make the chart easier to use, the specs below are grouped by engine family.
Kohler Valve Clearance Chart for K-Series and Magnum Engines
These older Kohler engines are still common on legacy mowing equipment, compact work machines, and utility applications. Most use mechanical valve clearance settings, but the exact spec still varies by model.
| Engine Series | Common Models | Intake Clearance | Exhaust Clearance | Notes |
|---|---|---|---|---|
| K-Series | K91 | 0.005 to 0.009 in | 0.011 to 0.015 in | Older single-cylinder engine |
| K-Series | K141, K161, K181 | 0.006 to 0.008 in | 0.017 to 0.019 in | L-head design |
| K-Series | K241, K301, K321 | 0.008 to 0.010 in | 0.017 to 0.019 in | Common service range |
| K-Series | K341 | 0.008 to 0.010 in | 0.017 to 0.019 in | Some 1800 rpm gensets may differ |
| K-Series Twin | K482, K532, K582 | 0.008 to 0.010 in | 0.017 to 0.020 in | Twin-cylinder flathead |
| K-Series Twin | K662 | 0.006 to 0.008 in | 0.015 to 0.017 in | Confirm by engine tag |
| KT Series | KT17, KT19, KT21 | 0.003 to 0.006 in | 0.011 to 0.014 in | Twin-cylinder |
| K361 OHV | K361 | 0.005 in | 0.005 in | OHV design |
| Magnum | M8 | 0.006 to 0.008 in | 0.017 to 0.019 in | Single-cylinder |
| Magnum | M10, M12, M14, M16 | 0.008 to 0.010 in | 0.017 to 0.019 in | Common service values |
| Magnum | M18, M20 | 0.003 to 0.006 in | 0.016 to 0.019 in early, 0.011 to 0.014 in later | Serial number matters |
Kohler Valve Clearance Chart for CS, Courage, and Triad Engines
These engines are often found on later commercial or residential equipment. The specs are more compact than many older Kohler models, so careful feeler-gauge work is important.
| Engine Series | Common Models | Intake Clearance | Exhaust Clearance | Notes |
|---|---|---|---|---|
| Command Pro CS | CS4, CS6, CS8.5, CS10, CS12 | 0.004 in | 0.004 in | Intake and exhaust same |
| Courage Single | SV470 to SV620 | 0.005 in | 0.007 in | Common on single-cylinder units |
| Courage Twin | SV710 to SV840 | 0.004 in | 0.006 in | Twin-cylinder range |
| Triad OHC | TH16, TH18 | 0.0005 to 0.0025 in | 0.003 to 0.005 in | OHC design |
Kohler Engines Commonly Listed With Hydraulic Lifters
Not every Kohler engine should be adjusted using a standard lash chart. Some engines are commonly listed as hydraulic, which means the service approach is different.
| Engine Series | Common Models | Intake | Exhaust | Notes |
|---|---|---|---|---|
| Aegis LH | LH630 to LH775 | Hydraulic | Hydraulic | Do not use generic solid-lash settings |
| Command / Command Pro | Many CH and CV models | Hydraulic | Hydraulic | Always verify by exact model and spec number |
If your engine falls into one of these hydraulic-lifter groups, it is better to confirm the exact service method before making adjustments. In many cases, inspection of rocker arms, push rods, and valve cover gaskets is more useful than applying a generic clearance number.
How to Identify the Right Kohler Valve Clearance Spec?
A chart is only useful if you are using the right row. Before adjusting anything, confirm exactly what engine you are working on.
Check the Engine Tag First
Look for:
- model number
- spec number
- serial number
- engine family label
This step matters because engines that sound similar on paper may use different valve setups in practice.
Separate Mechanical-Lash Engines From Hydraulic-Lifter Engines
One of the most common mistakes is assuming every Kohler engine uses a standard feeler-gauge adjustment. Many older K-Series, Magnum, Courage, CS, and Triad engines use measurable valve lash specs. Many CH, CV, and Aegis models are commonly listed as hydraulic.
If the engine uses hydraulic lifters, a normal Kohler valve clearance chart may not apply the way you expect. In that situation, it often makes more sense to inspect the valve train, breather area, and related sealing parts instead of forcing a lash adjustment.
Pay Attention to Serial Number Breaks
Some Kohler engines have different exhaust settings depending on serial range. Magnum M18 and M20 are good examples. That is why two engines in the same family may not always share the same spec.
Consider the Machine’s Working Conditions
On off-road equipment, dust, vibration, heat, and repeated hot restarts can speed up wear. If the machine also shows weak starting or inconsistent running, it helps to inspect spark plugs, ignition coils, and air filters while the valve system is being checked.
How to Adjust Kohler Valve Clearance?
Once you confirm the spec, the actual adjustment process is fairly simple. Most problems come from rushing the setup, especially when finding top dead center.
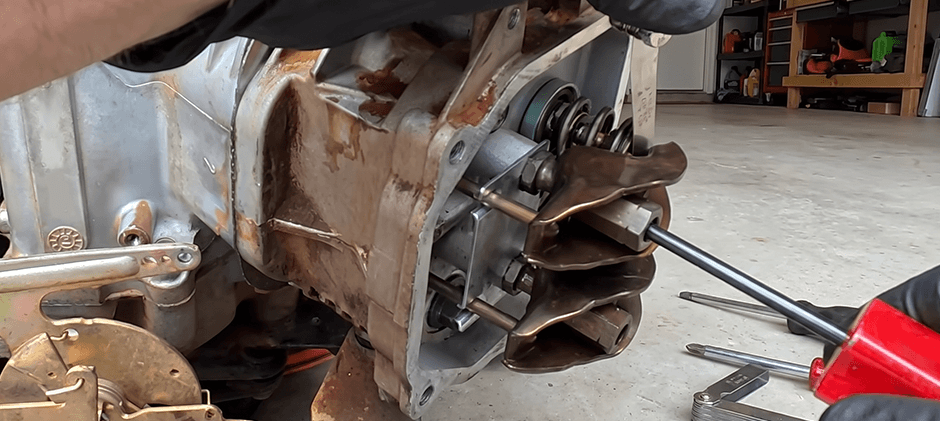
Tools You Will Need
- Feeler gauge set
- Wrench set
- Screwdriver
- Torque wrench
- Clean rag
- Basic tools for valve cover removal
1. Start With a Cold Engine
Valve clearance should be checked on a cold engine unless the service procedure says otherwise. Heat changes the reading and can easily throw off the final setting.
2. Remove the Valve Cover
Before opening the cover, clean the area well so dirt does not fall into the engine. This is especially important for equipment used in dusty or muddy work sites.
3. Find True Compression TDC
This is the step that causes the most trouble.
A simple field method is:
- Remove the spark plug, or both plugs on a twin
- Rotate the engine by hand
- Place a finger over the spark plug hole
- Feel for pressure building as the piston comes up
- Use a plastic straw, pencil, or screwdriver carefully through the hole to confirm piston height
- Stop at top dead center on the compression stroke
It is easy to land at top dead center on the wrong stroke. If that happens, the clearance reading will be wrong even if the feeler gauge work is perfect.
4. Measure the Clearance
Slide the correct feeler gauge into place and check the gap at the proper contact point for that engine. The gauge should move with light drag, not force, and not excessive looseness.
5. Make Small Adjustments
Loosen the lock nut and turn the adjuster slowly. Very small movement can change the reading more than expected, so recheck after each adjustment.
6. Tighten and Recheck
Hold the adjuster steady while tightening the lock fastener. Then measure the clearance again. Many settings shift slightly during tightening, so the second check is important.
7. Reassemble and Test
Before reinstalling everything:
- Inspect the cover seal
- Replace worn valve cover gaskets if needed
- Reconnect the spark plug lead
- Start the engine
- Listen for idle quality, valve noise, and throttle response
If the engine still cranks poorly after the valve setting is corrected, it may be worth checking related starting components such as the starter solenoid.
Signs Your Valve Clearance Is Out of Spec
Using the correct Kohler valve clearance chart is only part of the job. You also need to recognize when the engine is showing classic valve-clearance symptoms.
Common Signs of Tight Clearance
- hard hot starting
- low compression
- rough idle
- power loss under load
- backfiring
- risk of valve damage
Tight exhaust clearance is especially serious because the valve may not fully seat once the engine gets hot.
Common Signs of Loose Clearance
- tapping or ticking noise
- unstable running
- reduced power
- increased wear at the valve tip or rocker contact area
Common Field Symptoms on Off-Road Equipment
Valve clearance issues often show up as:
- longer crank time after shutdown
- weak pulling power on slopes
- rough operation under PTO load
- rising fuel use over time
These symptoms can overlap with fuel or ignition problems, so it is smart to inspect fuel filters, spark plugs, and intake condition during the same service interval.
Practical Tips for Longer Valve Train Life
A valve adjustment should solve the problem, not become a repeated short-term fix. If clearance keeps changing, there may be wear elsewhere in the valve train.
Here are a few habits that help:
Keep Intake Air Clean
Dusty conditions accelerate wear and can affect valve seating over time. Clean filtration matters more than many operators realize.
Service by Hours, Not Guesswork
Check valve clearance during scheduled maintenance, after major symptoms appear, or whenever the engine starts showing hard-start or power-loss complaints.
Never Assume One Kohler Spec Fits All
A K-Series spec should not be applied to a Courage twin, and a hydraulic-lifter Command engine should not be treated like a solid-lash Magnum.
Inspect Related Parts While You Are There
When the cover is off, take a quick look at:
- rocker arms
- push rods
- valve tips
- breather area
- sealing surfaces
A few extra minutes here can save a second teardown later.
Record the Final Setting
Write down:
- engine model
- final intake and exhaust clearance
- service date
- engine hours
That record makes the next service easier and helps track wear over time.
Final Words
A good Kohler valve clearance chart does more than list numbers. It helps you match the right spec to the right engine, avoid common adjustment mistakes, and get more reliable performance from your equipment. If related service parts are needed, FridayParts offers aftermarket parts with affordable pricing, high-quality products, wide compatibility, and a large inventory for many heavy equipment brands.
