

Running a Bobcat is simple. Do a quick walk-around, climb in, start it up, move the machine, work the loader, and shut it down when you’re done. Each step has a few rules you cannot skip — the safety bar, the parking brake, the bucket height while traveling. This guide covers the complete routine of how to operate a Bobcat skid steer.
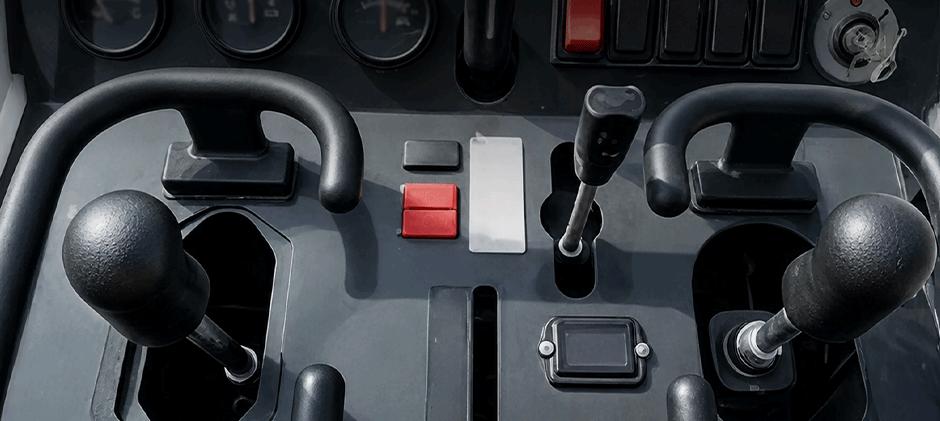
Quick Answer: How to Operate a Bobcat Skid Steer
Here’s the full sequence in three steps:
- Pre-check and start the machine — walk around, check fluids and pins, climb in, buckle up, and fire it up.
- Drive and operate the bucket — use the joysticks to move, steer, scoop, and dump.
- Shut down and troubleshoot — lower the bucket, idle down, cycle the hydraulics, and handle common issues.
Now let’s go through each one in detail.
Step 1: Pre-Check and Start the Machine
Walk Around and Check
Do this before you open the cab door. Two minutes now saves a breakdown later.
| What to Check | What to Look For |
|---|---|
| Tires or tracks | Cuts, low pressure, missing lug nuts |
| Hydraulic hoses | Leaks, cracks, rubbing against metal |
| Fluid levels | Engine oil, hydraulic oil, coolant — all between marks |
| Attachment pins | Fully seated and locked in place |
| Ground underneath | Fresh puddles of oil or hydraulic fluid |
Pay close attention to the hydraulic filter and the fluid sight glass. A clogged filter or low oil forces the pump to work harder and slows down every lift.
Get In and Start the Engine
Climb in using three points of contact — two hands on the grab bars and one foot on the step, or two feet and one hand. Never grab the joysticks to pull yourself up; they’re not built for that.
Once you’re in the seat:
- Buckle the seatbelt across your hips. Pull it snug.
- Pull the safety bar down until it clicks into place. The machine will not start or move unless this bar is fully latched.
- Turn the key to “On” and wait for the dash lights to cycle. If there’s a keypad, punch in the code.
- Release the parking brake. Look for the “P” light on the dash — press the toggle switch next to it until the light goes off.
- Press the green “operator presence” button if your model has one. This enables the hydraulic controls.
- Honk the horn twice. Alert anyone nearby that you’re about to move.
- Keep the throttle at idle or half speed while you get the feel of the controls.
Step 2: Drive and Operate the Bucket
Understand the Controls
Bobcat skid steers use one of two control patterns. Look at what you have before you start moving.
ISO Pattern (Most Common — Best for New Operators)
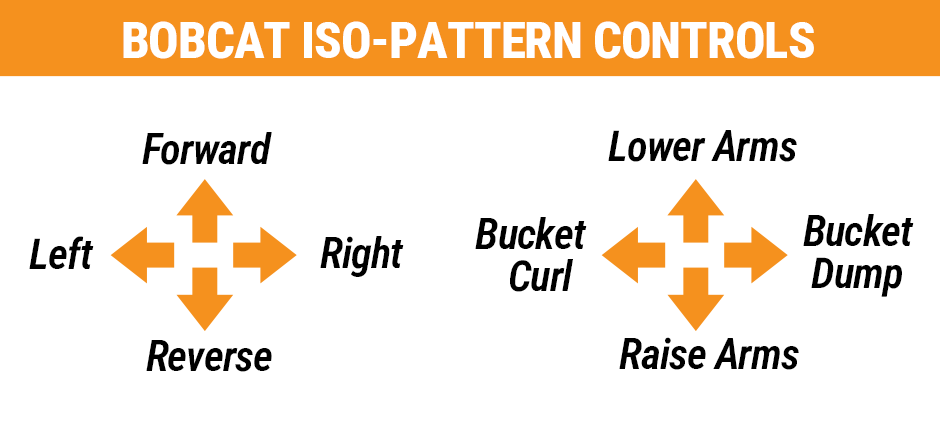
- Left joystick drives the machine. Push forward to go forward. Pull back to reverse. Push left to turn left, right to turn right.
- Right joystick runs the bucket. Pull back to raise the arms. Push forward to lower them. Move left to curl the bucket in, right to dump it out.
H-Pattern
- Left joystick controls the left drive and the lift arms.
- Right joystick controls the right drive and the bucket tilt.
Hand Levers and Foot Pedals (Older Models)
- Two hand levers control drive. Push both forward to go straight. Push one more than the other to turn.
- Left foot pedal raises and lowers the arms.
- Right foot pedal curls and dumps the bucket.
If your machine has a pattern selector switch, pick one pattern and stick with it for the whole shift. Switching mid-job causes mistakes.
Drive Smoothly
Keep the bucket 6 to 12 inches off the ground while moving. That gives you clearance over bumps and keeps the weight low.
- To go forward, push both joysticks (or hand levers) forward slowly. The further you push, the faster you go.
- To reverse, pull both back evenly.
- To turn, push one side forward more than the other. For a sharp turn, push one forward and pull the other back at the same time — the machine spins in place.
- To stop, let both joysticks return to neutral. Do it gently — the machine stops fast.
Start at low throttle until you feel confident. Jerk the controls and the machine jerks with you. Smooth hand movements give smooth driving.
On slopes, drive straight up and down. Never drive across a slope with a loaded bucket — the machine tips sideways.
Aggressive stick inputs wear out the drive belt and pump couplers. Feather the joysticks to keep the drivetrain healthy.
Load and Dump the Bucket
Never carry a loaded bucket raised high while traveling. Keep it low.
To scoop material:
- Approach the pile with the bucket flat on the ground.
- Drive into the pile slowly.
- As you enter, curl the bucket back (right joystick left, or right foot pedal forward) and raise the arms slightly at the same time.
- Back out of the pile with the bucket curled.
To dump material:
- Drive to the dump area and stop.
- Raise the arms to the needed height.
- Tilt the bucket forward slowly to dump the load.
- Lower the arms before you drive away.
Do not slam the bucket forward when dumping. That stresses the pins and rocks the machine. Let the load slide out.
If the arms hesitate mid-lift or drift down under load, check the hydraulic cylinders and hose fittings.
“Low and slow” is the phrase every trainer repeats. It works because it’s true.
Step 3: Shut Down and Troubleshoot
Shut Down Correctly
Do this every time, the same way.
- Park on level ground.
- Lower the bucket flat on the ground. Do not leave it raised.
- Idle the engine for 30 seconds to cool the turbo.
- Turn the key to “Off.”
- Cycle the joysticks or pedals through their full range to release trapped hydraulic pressure.
- Raise the safety bar, unbuckle, and exit using three points of contact.
If the cab door won’t open, the bucket isn’t fully down. Lower it the rest of the way — don’t force the door.
Common Issues and Quick Fixes
Even with clean operation, small problems pop up. Here’s how to spot them fast:
| Problem | What to Check |
|---|---|
| Engine won’t start | Safety bar not latched; seatbelt not buckled. The seat sensor blocks startup if either is open. |
| Machine won’t move | Parking brake still on. Look for the “P” light on the dash and release it. |
| Lift arms move slow | Low hydraulic fluid or clogged hydraulic filter. Check the sight glass and filter housing. |
| Warning light on dash | Stop and check the manual. It’s usually low oil, high temp, or a charging issue. |
| Machine pulls to one side | Low tire pressure or uneven track tension on one side. |
If a warning light comes on, stop immediately. Running through a warning damages the machine.
Learn the dashboard icons once, and you won’t guess again: thermometer for coolant, oil can for oil pressure, battery for charging, fuel pump for the tank.
Tips for New Operators
A few habits separate operators who last from those who don’t:
- Practice in an empty open lot before working near buildings or people.
- Keep the cab clean. Loose tools can jam under the pedals or joysticks.
- Fuel up at the end of the shift to reduce moisture buildup in the tank.
- Grease the pivot points every 8 to 10 hours of use — bucket pins and lift arm joints wear fast without it.
- Follow the service intervals in your operator’s manual. Regular replacement of filters and hydraulic fluid extends component life.
- Never carry a rider. The cab fits one person. No exceptions.
Final Words
Running a skid steer well comes down to repetition, respect for the machine, and steady maintenance. Follow the three steps, stick with one control pattern, and never skip the pre-check. You’ll feel comfortable after about 30 minutes of practice and confident after roughly 40 hours of seat time. Everyone was choppy at first — steady practice fixes it.
When it’s time to replace hydraulic parts, filters, belts, or seals, we recommend browsing FridayParts for quality aftermarket components at fair prices, with wide compatibility across most major machine brands and a deep inventory that ships fast.
