

How to clean a battery terminal starts with knowing that corrosion on a battery post doesn’t announce itself. Each week the starter drags a little more. You blame it on the cold, and then one morning it clicks, and the dash goes dim. The fix takes about ten minutes and a box of baking soda. Order matters more than effort: negative cable off first, let the soda neutralize before a brush touches metal, dry everything, positive cable back on last. Get the sequence wrong, and a wrench can bridge both posts. That arc pits metal, and it happens faster than you would expect. What’s below: the stuff to have out, the eight steps, the cases where cleaning is a waste of your afternoon, and how often this is genuinely worth doing.
What You Need Before Cleaning
Lay it all out first. Digging around for the socket set halfway through, with one cable already off, is how bolts end up somewhere in the engine bay you’ll never find them.
| Thing | Why |
|---|---|
| Safety glasses | The fizz spits, and so does a brush when it slips off the taper |
| Rubber or nitrile gloves | That crust is acidic. It finds every crack in your skin |
| Wrench or socket, sized to the clamp bolt | Not an adjustable. Soft bolts round off at the worst moment |
| Stiff brush plus an old toothbrush | The toothbrush is the only thing that fits inside the clamp |
| Battery post brush | Cleans the taper instead of polishing the top |
| Rags | One for residue, one for drying |
| Small cup | Mixing only. Keep it off the battery top |
| Baking soda, warm water | The entire chemistry, right there |
| Terminal protectant or dielectric grease | Goes on at the very end |
For these and other battery accessories, check availability before the job starts. Skip the aerosol “battery cleaner” at the parts counter. Read the label: baking soda, water, and a markup. Paste you mix yourself stays where you put it instead of running down the side of the case.
How to Clean a Battery Terminal Step by Step
Swollen case. Sides bulging. Acid weeping at the seam, or a wet patch that keeps coming back after you wipe it. None of that is a cleaning problem. Put the wrench down and replace the battery — a cracked case that lets go under load is how people end up with acid on their forearms. If the machine sits for long periods between uses, a battery charger helps keep the replacement battery in good condition.
Light surface crust? This is how to clean a battery terminal in eight steps.
Step 1: Kill the power, then take a real look.
Key out, machine off, block and exhaust left to cool. Then look at the top of the battery instead of just staring at the clamps, because the pattern tells you what you’re dealing with. White or blue-green fuzz on the posts. A clamp you can twist by hand. Damp around the base. Strands starting to fray where the cable meets the lug.
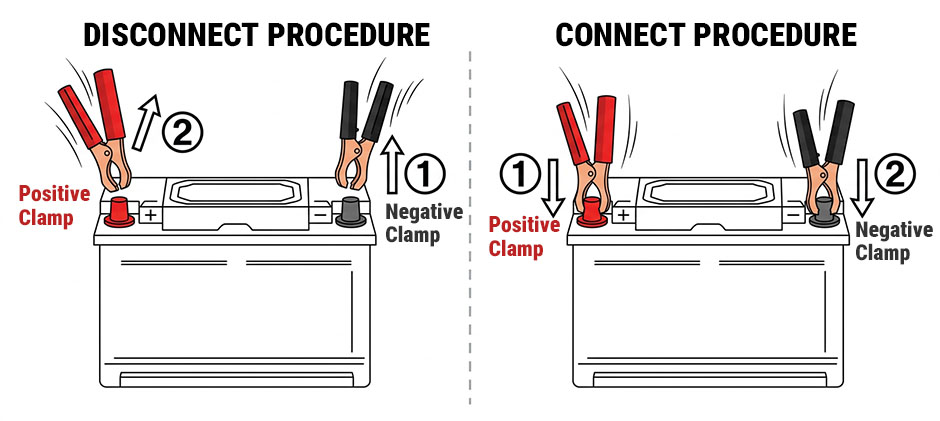
Step 2: Negative cable off first.
Everyone rushes this one, and it’s the one that bites. The negative post ties to the frame, which means a wrench slipping on the positive side only has to touch a body panel to build a dead short through whatever sits between that panel and ground. You’ll lose the wrench. You may lose some skin.
So: negative off, then set it somewhere it can’t swing back against the post. Positive comes after that.
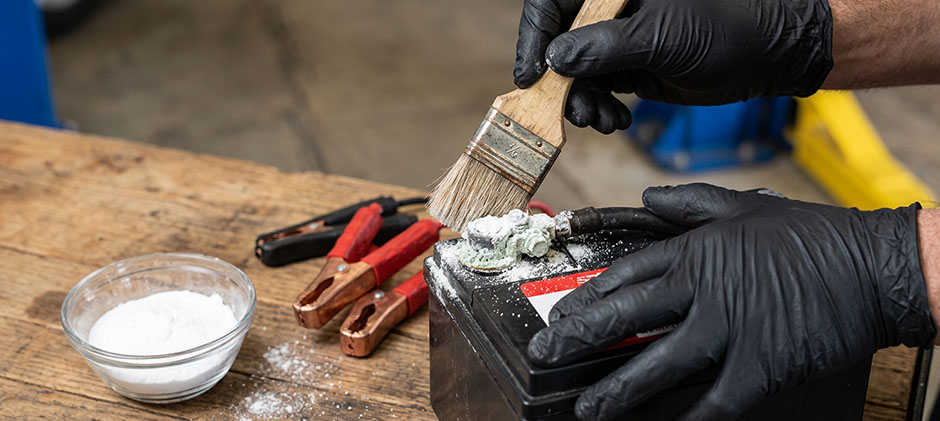
Step 3: Mix the paste in the cup.
Heaped tablespoon of baking soda into a cup of warm water, stirred until it quits dissolving. You want thin porridge, not water. Mix it in the cup — never shake dry soda across the battery top. The dust goes everywhere, and the vent caps are sitting right there.
Step 4: Put it on, then walk away for a few minutes.
Spoon or brush it over the crusted spots and leave it alone for 2–3 minutes. The fizzing is the actual work: bicarbonate hitting lead sulfate, breaking it into something water-soluble and soft enough to brush off. Rush this stage, and you’ll scrub hard enough to take good metal with the corrosion, which just gives the next round somewhere to start.
Step 5: Scrub the post and the inside of the clamp.
Plastic brush first. Post brush or a light wire brush only where the buildup won’t move otherwise.
This is where most jobs quietly fail. The visible top of the post comes up clean in about thirty seconds and looks finished, while the bore inside the clamp is still coated with the stuff that actually matters. That bore carries every amp going to the starter. A clamp tightened onto a dirty bore touches on a fraction of its face — so you still have the slow crank you came out here to fix, and a month later it’s back, worse.
Four surfaces: the post taper, the inside of the clamp, the outside of the terminal, and any green that’s crept onto the ground strap.
Step 6: Dry it. Properly.
Rag the residue off, then let the area air-dry before anything goes back together. Water trapped under a clamp is worse than the corrosion you just removed. It conducts badly, and it invites the whole cycle to start over.
Step 7: Positive back on first, then negative.
Snug. Not gorilla-tight. Over-torque a clamp bolt on a lead post, and you either strip the thread or stretch the clamp, and a stretched clamp never grips the same way twice. A 12-volt system will keep starting on a clamp that’s barely finger-tight, sometimes for months, which is exactly why loose clamps survive right up to the first cold morning. If the bolt bottoms out and the clamp still spins by hand, that clamp is finished. Replace it.
Step 8: Seal the joint.
A thin film of dielectric grease, or a light pass of terminal protectant, around the outside of the connection. Thin is the point. A thick coat collects grit and looks like someone gave up halfway.
What Makes a Clean Last
Most guides on how to clean a battery terminal hand you the steps and stop. The detail sits at the edges.
| Do this | Because |
|---|---|
| Negative off first | A slip on the positive side shorts to the frame |
| Neutralize before scrubbing | Dry scrubbing grinds acid salts down into the clamp |
| Clean the bore, not just the post | Contact area is what carries current |
| Dry every surface | Moisture under a clamp corrodes faster than leaving it alone |
| Positive on first at the end | Keeps the short risk at the end of the job, not the start |
| Thin protectant | Seals moisture out without trapping grit |
| Don’t | What you get |
|---|---|
| Shake soda across the battery top | Dust and runoff find the vent caps |
| Reconnect while still wet | Fresh corrosion, weak contact |
| Scrape down into soft bare metal | Takes the plating with it, speeds up the next round |
| Leave a loose clamp “for now” | Behaves like a dead battery, and the terminal runs hot |
| Adjustable wrench on a soft bolt | Rounds the head when your patience is thinnest |
If a clamp won’t tighten after cleaning, it’s a part now, not a maintenance item.
Why Corrosion Keeps Coming Back
Cleaning fixes it more often than not. The rest of the time it just tells you what the real problem was all along.
The usual suspects are a short list. Charging gases vent past the cap. Moisture and dust settle on the top. A charger gets left hooked up for a week. Somebody’s clamp bolt has been loose since spring. Acid weeps past the post seal. The case has a hairline crack, or the machine sat from October to March without being run once.
Crust back inside 2–3 weeks? Stop cleaning and start testing. Fast returns usually mean the charging side is overdoing it. Meter on the alternator, check the voltage regulator, then check whether the hold-down is loose enough to let the battery hammer its own cables.
When to Replace Parts
There’s a line, and it’s usually obvious once you’ve crossed it. A clamp that still turns after you’ve tightened it. Green tracked up inside the insulation, which means the acid is inside the wire where no brush will ever reach it. A post worn thin or pitted. A case that’s cracked or swollen. A terminal that gets hot while the engine cranks. And a machine that still turns over slowly on clean, tight connections — that one usually isn’t the terminal at all.
How Often to Clean
| Inspection | Interval | What it catches |
|---|---|---|
| Visual check | Monthly | Buildup while it’s still a film |
| Light clean | Every 6 months | Stops the hard-start stage |
| Full clean and protect | Every 6–12 months | Restores full contact area |
| Extra look | Before cold weather or your busy season | Cuts no-start risk when downtime hurts most |
Wet, dusty, muddy work shortens all of it. Machines on muck duty, or parked outside through a winter, want the visual check closer to every two weeks.
Habits That Prevent Corrosion
Nothing on this list is clever, and this is where most of the benefit actually sits. Battery terminal cleaning is mostly about what you do between cleanings.
Keep the top of the battery dry and reasonably clean. Confirm the hold-down bracket is tight, because a battery that shifts wears through its own cable. Spray protectant on after every clean. Check the covers and terminal boots where they’re fitted. And run the machine every 3–4 weeks while it’s in storage, instead of letting it sit from October to March and hoping for the best.
Final Words
Sometimes the corrosion has already done its damage, and the honest fix is a clamp, a cable, or a ground strap rather than another afternoon with a brush. Cable with green tracked up under the insulation doesn’t come back. Neither does a post worn down to a taper that no clamp will grip. FridayParts carries aftermarket battery cables, terminal clamps, and ground straps across a long list of machine brands, so pricing the part before you decide a loose clamp is good for one more season costs you nothing. Better than finding out in January that it wasn’t.
