

Removed the belt without taking a photo first? The right Exmark drive belt diagram depends on which of the three decals is on your frame: 633463, 323427, or 413206. Each model—Quest, Lazer Z, and Turf Tracer—runs a different routing. Use the wrong one, and you’ll have the belt on the wrong side of an idler within an hour. All three diagrams, the serial-number shortcuts, and the belt-swap steps that save a trip back to the dealer are mapped out below.
Belt Routing Diagrams by Decal Number
Three routing decals cover most Exmark residential and commercial decks. The number printed in the bottom corner of each decal tells you which belt path belongs on the machine. If the sticker on your frame is still readable, match it against one of the three below before threading anything.
Drive Belt Routing for Decal 633463
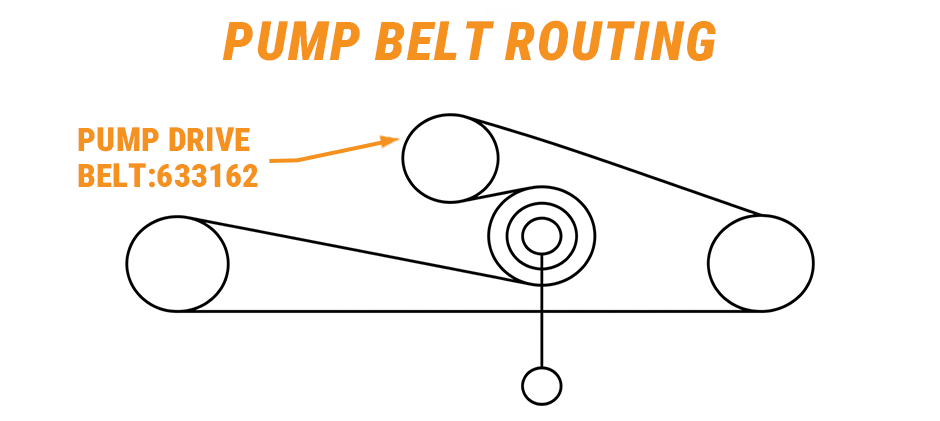
Note: 633463 is the decal part number printed in the corner. 633162 is the actual pump drive belt to order.
The 633463 decal shows the pump drive belt running from the engine pulley down to the twin hydro pump pulleys. The belt forms a tight triangle with a stationary idler on one side and a spring-loaded tensioner on the other. This pattern appears on most Quest S-Series and E-Series units with twin hydro pumps.
Key points for this layout:
- Engine pulley sits at the top center
- Belt wraps the two pump pulleys below the frame
- One idler stays fixed, the other floats on a tension spring
- Belt length runs around 30 inches on Quest models
If the belt is slipping off under load, check the spring first. A stretched or broken tensioner spring is the usual cause before the belt itself is to blame.
Blade Belt Routing for Decal 323427
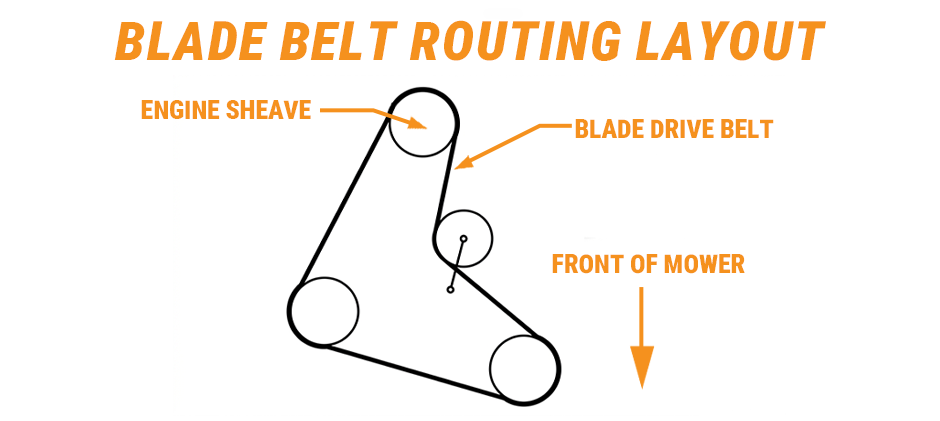
The 323427 decal maps the deck belt for five-hydro and larger Lazer Z mowers. The belt starts at the engine sheave at the rear of the deck, crosses the blade drive pulleys, and returns through a floating idler. On the decal, the arrow marked FRONT OF MOWER points toward the discharge side. That’s important because cogged versions of the belt only track correctly in one direction.
Watch for:
- Engine sheave at the top of the diagram
- Three blade spindles in a staggered pattern
- A single idler maintaining tension on the return side
- Flat side of the belt rides on the idler, cogged side wraps the spindles
A worn deck drive belt usually shows glazing on the inside face before it starts to fray. Replace a quality mower deck belt before the fibers show through.
Spring Tension Idler Layout for Decal 413206
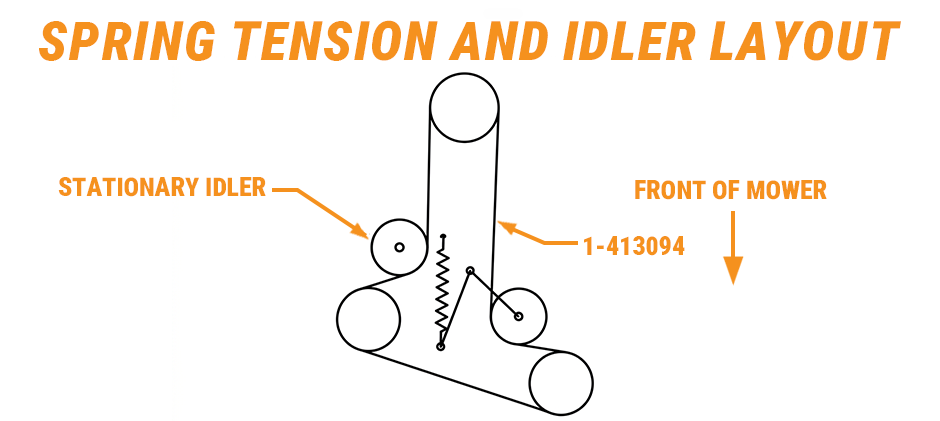
The 413206 decal applies to decks using the 1-413094 spring and a stationary idler on the opposite side. This setup is common on mid-size Lazer Z and Turf Tracer walk-behinds. The belt loops around a single large spindle at the top, crosses between the stationary idler and the spring-loaded arm, then returns to the drive pulley.
Signs this is your layout:
- Only one visible spring on the deck underside
- Stationary idler marked separately from the tension arm
- Belt tension adjusted by the spring, not a manual bolt
Keep the spring hooked at both ends during install. Letting it fly loose is how most people lose the small retainer clip into the grass.
How to Identify Your Correct Diagram?
To quickly confirm the right Exmark drive belt diagram for your mower, check the model and serial tag. On zero-turns, you’ll find it under the seat or on the left frame rail. On walk-behinds, it is usually on the lower handle bracket.
Write down two things:
- The model code, for instance QTS708GEM50200
- The serial number range, for instance 316,000,000 and higher
The first three letters tell you the family:
- QTS: Quest S-Series
- QTE: Quest E-Series
- QZE or QZS: Quest Z E-Series or S-Series
- LZS or LZX: Lazer Z S or X-Series
- TTS: Turf Tracer S-Series
Serial ranges matter because Exmark changed belt routing mid-production on several models. A 2012 Quest and a 2018 Quest with the same deck size may use different belts and different idler positions.
| Model Family | Typical Decal | Belt Function | Common Belt Part |
|---|---|---|---|
| Quest S-Series, QTS | 633463 | Pump drive | 1-633162 or 1306976 |
| Quest E-Series, QTE | 633463 | Pump drive | 1-633162 |
| Lazer Z five-hydro | 323427 | Blade drive | Varies by deck width |
| Lazer Z mid-frame | 413206 | Deck tension | 1-413094 spring |
| Turf Tracer, TTS | 413206 | Hydro drive | Model specific |
Cross-check the belt number stamped on the old belt before ordering. Length and tooth profile vary within the same family. A replacement drive belt that runs a quarter inch short will ride off the idler within an hour of mowing.
Step-by-Step Belt Replacement Tips
Belt swaps on Exmark decks go smoother with the mower raised and the rear wheels off. The pump pulley sits high enough that you cannot reach it from above on most Quest models.
Prep steps:
- Park on level ground and chock the front casters
- Lift the rear with jack stands rated for the mower weight
- Pull both rear wheels, standard lug pattern
- Remove the undercarriage shield, usually 14 mm bolts
Routing the new belt:
- Lay the belt flat around the pump pulleys first
- Hook it over the stationary idler
- Pull the tension arm back against the spring
- Slip the belt onto the engine pulley last
- Release the tension arm slowly to seat the belt
If the belt will not stretch over the engine pulley, you have it threaded on the wrong side of an idler. Trace the Exmark drive belt diagram again before forcing it.
Common install mistakes:
- Belt twisted a half turn between pulleys
- Cogged side facing out when it should face in
- Spring hooked on the wrong tab, giving too little tension
- Shield reinstalled before testing
Run the mower at idle for a minute with the deck disengaged, then engage the blades at low throttle and listen. A chirp or squeal means the belt is riding an idler flange. Shut down and recheck before taking it out to cut.
When the Diagram Decal Is Missing or Unreadable
Faded or peeled decals are common on mowers that have spent a few seasons outside. If the one on your frame is gone, you still have ways to get the correct Exmark drive belt diagram without guesswork.
Three ways to find the routing:
- Enter the serial number into the Exmark belt diagram lookup tool
- Pull the parts manual PDF for your model code and check the belt and idler assembly page
- Match the pulley count and spring position to one of the three decals shown above
A quick photo of the belt path before you remove the old belt can save hours later. Even a phone shot from under the deck shows which side of each idler the belt rides. For older machines with no photo available, a new mower belt kit with the matching part number is usually cheaper than guessing wrong twice.
The belt itself tells a story too. Look at the glazed side after removal. The polished face rode the pulleys and the matte face rode the idlers. That alone can rule out two of the three layouts.
Final Words
Confirm the decal number, the model prefix, and the belt length together before any part leaves the cart. Guessing on one of the three usually means a second order a week later. FridayParts carries aftermarket belts, idlers, springs, and spindle hardware for Quest, Lazer Z, Turf Tracer, and other Exmark decks at affordable pricing, with a deep inventory covering many mower and compact equipment brands beyond Exmark too.
