
When we find oil in the coolant on an off-road machine, we’re not looking at a “minor mess.” Coolant and oil are supposed to stay in separate paths. Coolant carries heat out of the block and head. Oil protects bearings and moving parts. If they mix, one of two things is happening: a seal has failed, or metal has cracked. Either way, we want to act fast—because the longer we run it, the more likely we are to turn a sealing repair into a full cooling-system cleanup.
Below, we’ll break down what oil in the coolant means for off-road equipment, what it looks like, the main symptoms, how to prevent it, and what happens if we ignore it.
Why is Oil in the Coolant?
On off-road machinery (excavators, dozers, loaders, tractors, harvesters), oil in coolant usually comes from an internal leak where oil pressure meets coolant passages. These are the most common causes.
1) Blown head gasket
The head gasket seals the joint between the cylinder head and engine block. It has to seal three things at once:
- combustion pressure
- coolant passages
- oil passages
When the gasket fails—often after overheating, improper torque, or surface warp—engine oil can push into the cooling system.
What we often see on equipment:
- overheating under load
- coolant pushing out of the overflow
- oily residue in the reservoir
- sometimes rough running (not always)
2) Failed oil cooler
Many diesel engines use an oil cooler that transfers heat from oil to coolant. If the cooler core or internal seals fail, oil can leak into the coolant without obvious misfire or power loss at first. That’s why oil cooler problems can fool us into thinking “head gasket” too early.
Typical clue: The machine “still works,” but the coolant gets oily, and the radiator becomes coated.
3) Cracked cylinder head or engine block
A crack can connect an oil gallery to a coolant jacket. On off-road machines, this can happen after:
- severe overheating
- freeze damage (coolant not protected)
- long-term corrosion from neglected coolant
Cracks are less common than gasket or cooler failures, but they’re serious.
4) Installation or service issues
After major work, cross-contamination can come from:
- Wrong gasket type for the engine family
- Dirty mating surfaces
- Incorrect torque sequence/angle
- Reusing torque-to-yield fasteners where the engine calls for new ones
This is why we treat diagnosis like a checklist instead of guessing.
Transition: Now that we know the usual paths, let’s talk about what oil in the coolant actually looks like in the real world—because early detection saves money.
What Oil in Coolant Looks Like?
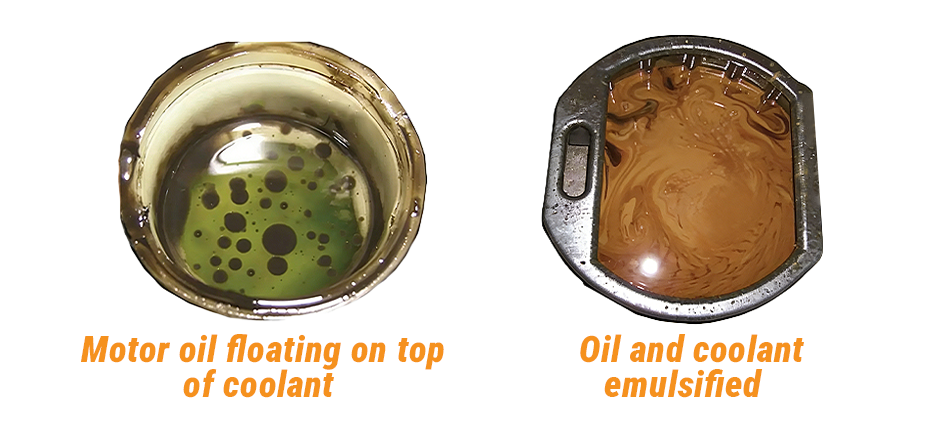
In the early stages, oil in the coolant often looks subtle. If we only check the machine when it’s already overheating, we’ll miss the first warning signs.
Early-stage signs
- a thin oily sheen on the coolant surface
- small black/brown dots floating in the reservoir
- greasy film on the underside of the cap
Later-stage signs
As oil and coolant churn together, they can form a tan/brown emulsion. Many techs describe it as:
- “milky sludge”
- “chocolate shake”
- “creamy paste” on the cap and tank walls
Quick inspection tips for off-road owners
- Let the machine cool fully—never open a hot cooling system.
- Check the reservoir: look for sheen, dots, or tan sludge line.
- Wipe the cap with a white paper towel: oil shows up fast.
- Look at hoses: oil contamination can soften rubber and cause swelling.
Transition: Visual clues help, but we still need to connect them to machine behavior. Next is the symptom pattern we see most often.

The Main Symptom Of Oil In The Coolant
The #1 symptom is visible contamination (sheen or milky sludge). But on off-road machinery, the more costly symptom is what that contamination does to heat control.
What we usually notice first on the jobsite
- overheating under load (grading, digging, harvesting, long hill pulls)
- coolant smell and overflow after shutdown
- The fan is running more than normal
- “runs hot lately” trend compared to last season
- loss of cab heat (if the machine uses a heater core)
What’s happening behind the scenes
Once oil is in the coolant:
- Heat transfer drops because oil coats radiator tubes and engine passages
- Deposits build up and restrict flow
- The cooling system can foam or trap air pockets
- Rubber parts can degrade faster
A practical cause-and-effect table
| Likely source | What we tend to see | Quick checks | Typical fix path |
|---|---|---|---|
| Head gasket leak | oily coolant + overheating + possible hard start after hot soak | cooling system pressure test; compression/leak-down; combustion gas check in coolant | Replace the gasket, check head flatness, and flush the cooling system |
| Oil cooler failure | oily coolant, but the engine may still pull normal | isolate/pressure test oil cooler; inspect cooler housing seals | Replace cooler/seals, flush cooling system |
| Cracked head/block | repeat contamination, overheating history | pressure test; teardown inspection; crack testing at machine shop | repair/replace casting, flush cooling system |
| Service/assembly issue | contamination soon after repair | verify part numbers, torque method, surface finish | correct installation, replace gasket/seals, flush |
Transition: Off-road engines don’t fail in a vacuum. Duty cycle matters. That’s why the next section uses a combine harvester example—because it shows how workload, airflow, and cooling design can push small problems into big ones.
How Does a Combine Harvester Work?
A combine is a perfect example of why oil in the coolant often shows up at the worst time: peak workload, high ambient temps, and long run hours.
What is the engine doing all day?
On most combines, the diesel engine isn’t just “driving.” It’s feeding power to multiple systems at once:
- propulsion (hydrostatic drive or transmission)
- threshing and separation components (rotor/cylinder, walkers)
- hydraulic pumps (header lift, reel, unloading auger functions)
- cooling fans and accessory loads (A/C, alternator)
That means the engine runs at a steady high RPM for long stretches. Even a small loss of cooling efficiency can become an overheating event.
Why are cooling systems on harvest equipment easy to overload?
Many combines have a stacked cooling package (radiator + charge air cooler + hydraulic cooler, and sometimes fuel cooler). Dust, chaff, and fine plant fibers build a “mat” on the fins. When airflow drops:
- Coolant temperature rises
- Oil temperature rises
- Metal expands more than normal
- Sealing surfaces and coolers see extra stress
This matters because the head gasket has to hold a tight seal while the head and block expand at different rates. If we get even a small warp or clamp-load change, the gasket can start leaking between oil and coolant passages.
How does oil contamination build up after a small leak starts?
Once a leak begins, the process can accelerate:
- Oil pressure is often higher than coolant pressure, so oil migrates into the coolant.
- Oil coats internal cooling passages and radiator tubes.
- Heat transfer drops, making the engine run hotter.
- Hotter operation increases the chance of further gasket damage or cooler failure.
This is why some owners say, “It only overheated once,” but the coolant becomes milky a few days later. The first overheating can be the event that starts the leak, and the contamination shows up after more hours.
The combined takeaway
If we rely only on warning lights, we’re late. The earlier we catch:
- rising operating temp trends,
- Repeated need to top off coolant,
- oily film in the reservoir,
The more likely the repair stays limited to sealing parts and a proper flush, instead of radiators, hoses, and downtime in the middle of the season.
Transition: With that duty-cycle picture in mind, prevention becomes clearer: keep heat under control and keep coolant chemistry healthy.
How to Prevent Oil From Leaking into Coolant?
We can’t prevent every failure, but we can prevent many of the conditions that cause them.
Cooling system habits that reduce risk
- Clean the cooling package correctly and often (especially stacked coolers).
- Keep coolant at the right mix and use the coolant type recommended for the engine family.
- Change coolant on schedule so corrosion inhibitors don’t drop off.
- Replace weak caps and aged hoses before they fail under pressure.
- Watch trend data (temps under similar loads) instead of waiting for alarms.
Maintenance practices that protect sealing surfaces
- Avoid repeated overheating events. One bad overheat can warp a head.
- After any overheating, inspect: fan clutch/drive, thermostat, water pump, and radiator fin condition.
- Use proper torque sequence and correct gasket type during repairs.
When prevention turns into parts planning
If the diagnosis points to sealing failure, we usually don’t replace only one item. A reliable repair often includes:
- a new head gasket (matched to engine model)
- inspection of head and block surfaces
- coolant flush and refill
- checking water pump, thermostat, and radiator condition
For the sealing interface itself, using the right head gaskets matters because the gasket has to contain combustion pressure and keep coolant and oil separated under heat cycling. FridayParts notes that their aftermarket head gaskets are designed to handle demanding sealing tasks and come in multiple material designs (like composite and MLS-style constructions) for different applications.
And if we’re building a full repair list—filters, pumps, injectors, water pump, or other spares—having a single source for compatible engine parts can reduce downtime. FridayParts positions their engine catalog around broad compatibility across many heavy equipment brands and a large inventory, which is useful when we’re trying to get a machine back to work fast.
What happens If Oil Gets into the Cooling Water?
If we ignore oil in the coolant, the cooling system and the engine both take hits.
1) Overheating risk goes up
Oil coats radiator tubes and engine cooling passages. That film blocks heat transfer. Under load, this can push temps into the danger zone quickly.
2) Deposits can clog flow paths
Oil + coolant + heat can create sticky residue that restricts:
- radiator cores
- small coolant passages in the head
- thermostats and bypass circuits
- heater circuits (if equipped)
3) Rubber parts can degrade
Oil contamination can soften hoses and seals. Even after we fix the root cause, old hoses may start leaking because the material has been attacked.
4) Repair costs rise fast
A best-case repair might be: fix the source + flush.
A worst-case repair can include: radiator replacement, hose kit, water pump, plus internal engine damage if overheating repeats.
What we should do the moment we spot it
Here’s a simple action list for owners:
- Stop heavy work.
- Let it cool fully; confirm contamination visually.
- Plan proper tests.
- Fix the root cause.
- Flush the cooling system thoroughly and refill with the correct coolant.
Final Thought
Finding oil in the coolant on off-road machinery points to an internal leak—most often a head gasket issue, an oil cooler failure, or damage to the head/block after overheating. Don’t keep running the machine and hope it clears up. Confirm the cause with basic pressure and engine tests, repair the failed part, and flush the cooling system completely. Quick action protects the radiator, hoses, and the engine core—and usually costs far less than running it to failure.