
An air seeder is a large farming tool that uses air pressure to move seeds and is used to plant seeds quickly and evenly across large fields. It’s especially useful for large farms or in tough soil conditions. In this FridayParts guide, we’ll break down what an air seeder is, how it works, and how you can keep yours running efficiently.
What Is an Air Seeder?
An air seeder is a machine that spreads seeds into the soil across wide areas.
It holds a large amount of seed and fertilizer in one or more tanks (called an air cart).
This lets farmers work longer without stopping to refill, saving time and fuel.
Air seeders are also great for no-till or minimum-till farming. That means the soil is disturbed less, keeping it healthy and holding moisture better. To improve soil quality even more, farmers often ask, “How to Use Soil Conditioner?”
How Is an Air Seeder Different From a Planter?
Both machines plant seeds — but they do it differently.
- A planter places each seed carefully at a precise spacing and depth.
This is best for crops like corn and soybeans, where exact spacing matters.
- An air seeder measures and spreads seeds by volume, not individually.
It’s better for crops like wheat, barley, or canola, where planting speed and wide coverage are more important.
In short:
Planters are built for precision. Air seeders are built for speed and coverage.
How Does an Air Drill Seeder Work? The 3 Key Steps
An air drill seeder might look complicated, but it really works in three simple steps.
Each step moves the seed from the tank to the soil in a controlled way.
Step 1: Metering the Seed
It all starts in the air cart.
Inside the tank, a moving roller (with small grooves called flutes) releases a set amount of seed into the system.
The faster this roller turns, the more seed drops.
You can adjust the rate anytime to match your crop’s needs.
Step 2: Delivering with Air
A powerful fan blows air through large hoses.
The seeds drop into this fast-moving air stream and are carried down the hoses toward the seeding tool.
The air moves the seed gently but quickly, making sure it reaches every opener across the width of the drill.
Step 3: Placing the Seed in the Ground
The air and seed mixture flows into distribution towers, which split it into smaller hoses.
Each hose goes to a seed opener on the drill — a metal disc or shank that cuts a small trench in the soil.
The seed is dropped into the trench, and then a packer wheel presses the soil back over it to ensure good contact and growth.
What Are the Main Components of an Air Seeder System?
Knowing the main parts of your air seeder makes it easier to operate and maintain.
Most air seeding systems have these four key sections:
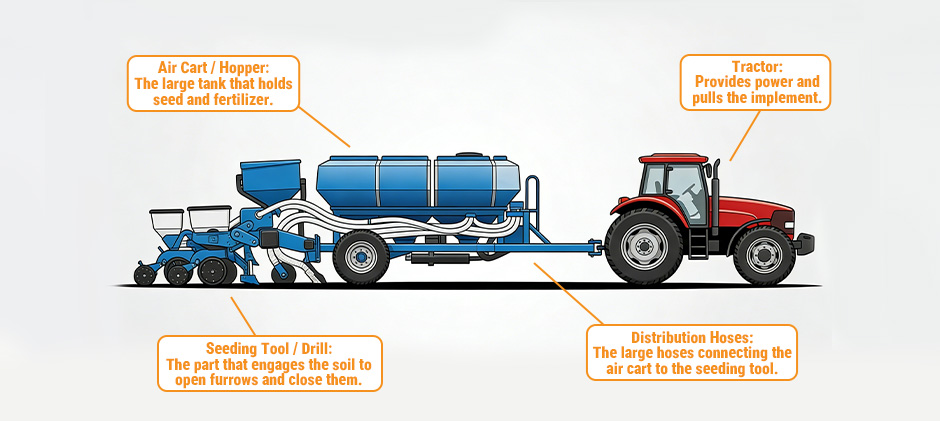
The Air Cart (or Hopper)
The air cart is the main tank that holds all your seed and fertilizer.
It often has separate compartments for each product.
It also holds the metering system and the fan that moves the air through the system.
The Metering System
This is the part that measures how much seed goes out.
It sits at the bottom of the air cart and uses rollers or fluted meters to dispense a set rate of product.
A good metering system ensures even seed distribution and consistent crop growth.
The Distribution System (Fans and Hoses)
This includes the fan, large and small hoses, and towers that carry the seed.
Its job is to deliver the metered seed evenly across the whole width of the seeder without clogging or breaking the seed.
The Seeding Tool (The Drill)
The drill is the part that touches the ground.
It has openers to cut small furrows, and packers or wheels that close them again.
The drill’s width determines how much ground you can cover in one pass — the wider, the faster you plant.
The choice between a Plow vs Tiller: Which Is Better for Spring Planting? depends on similar principles of ground preparation.
5 Key Benefits of Using an Air Drill Seeder
Farmers use air seeders because they offer several practical benefits:
- High Efficiency: Large tanks and wide drills mean less stopping and more planting.
- Versatility: Works well with many types of seed — from small canola to larger cereal grains.
- Better Soil Health: Great for no-till farming, which prevents erosion and keeps moisture.
- Saves Time and Fuel: You can plant and fertilize in one pass instead of two.
- Even Crop Growth: Accurate depth control and consistent seed flow mean uniform crops.
What to Check When Maintaining Your Air Seeder
Proper maintenance prevents breakdowns and ensures even seeding.
Here’s what to check regularly before and during planting season:
1. Hoses and Seals
Look for cracks, loose connections, or air leaks.
Leaks can cause uneven seed flow or lower pressure, which affects planting accuracy.
2. Openers and Press Wheels
These parts wear down over time.
Worn openers make uneven furrows, and worn press wheels won’t close trenches properly.
Inspect and replace them as needed.
3. Metering System
Check that the rollers and flutes are clean and not worn.
Before the season starts, calibrate your meters to make sure the seeding rate is accurate. This is a critical part of determining if your Is Your Planter Ready for Spring.
4. Air System
Inspect the fan, towers, and hoses for dirt, leftover seeds, or debris.
A clean air system prevents blockages and ensures even airflow to each row.
Conclusion
An air seeder is essential for anyone planting large fields. It saves time, reduces labor, and creates even, healthy crops when used correctly. And regular checks and good maintenance are the keys to reliable performance. When components start to show wear, don’t wait — replace them with reliable parts built to match your machine.
At FridayParts, we offer a full range of John Deere Air Seeder Parts and other agricultural equipment parts engineered for durability and a perfect fit. From air hoses and meters to fan assemblies and openers, our parts help your equipment stay in top condition.