
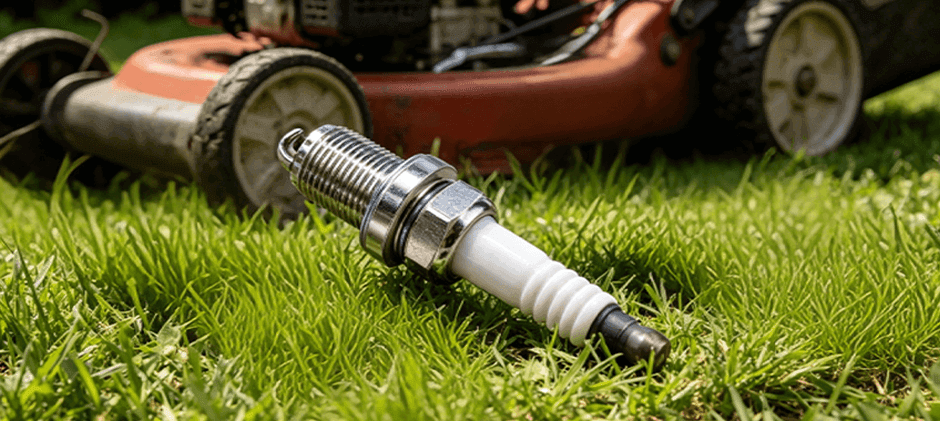
If your lawn mower is hard to start, runs rough, or loses power, the fastest “first check” is often the lawn mower spark plug. In most cases, you can remove it in minutes with basic tools—without guessing or replacing random parts. This guide walks through the signs that removal is needed, the safest removal steps, how to check the plug once it’s out, and why changing plugs on schedule helps prevent downtime during mowing season.
Sign of Spark Plug Needs to be Removed
A spark plug does two jobs at once: it lights the air-fuel mix and it “shows” what’s happening inside the cylinder. When the engine starts acting up, removing the plug gives you proof instead of guesses.
Common signs you should remove and inspect the plug
These symptoms often point to plug wear, deposits, or an ignition issue:
- Hard starting (more pulls/cranks than normal)
- Rough idling or uneven running
- Power loss under load (bogging in thick grass)
- Higher fuel use than normal
- Engine misfires (popping, uneven exhaust note)
- The engine starts, then stalls soon after
FridayParts’ mower guidance also highlights typical “bad plug” clues: visible damage, dirt, black soot, white deposits, and weak or absent spark. It also notes that plugs are not universal and vary by engine model, heat range, and gap—so inspection helps you avoid buying the wrong part.
“Remove it now” situations
Remove the plug right away if any of these are true:
- The mower has been stored and now won’t start
- The engine ran fine, then suddenly ran rough
- You smell raw fuel after repeated start attempts (possible flooding)
- You see a damaged plug boot/wire (misfires often follow)
Transition: Once the symptoms point toward the plug, the next step is removing it without stripping threads or dropping debris into the cylinder—two mistakes that can turn a simple tune-up into a repair.
How to Remove a Spark Plug on a Lawn Mower?
Safety and setup (worth 2 minutes)
A lawn mower engine bay is usually dusty, and the cylinder head threads are often aluminum. Safe setup prevents dirt from falling into the engine and prevents thread damage.
Do this first:
- Park on a flat, stable surface and let the engine cool.
- Turn the mower off and remove the key (if equipped).
- If your mower has a fuel shutoff valve, close it (helps prevent fuel leaks during handling).
- Gather tools.
Tools checklist
| Tool | Why it matters |
|---|---|
| Spark plug socket (correct size) + ratchet | Protects the ceramic insulator and grips the plug correctly |
| Extension (optional) | Helps reach recessed plugs |
| Shop towel | Wipe dirt and handle the plug safely |
| Soft brush or compressed air | Cleans around the plug before removal |
| Gap gauge (feeler gauge) | Needed for checking/setting plug gap |
| Penetrating oil (optional) | Helps if threads are stuck—use sparingly |
Step-by-step removal
1. Locate the spark plug.
On many mowers, it’s on the side/front of the engine, covered by a rubber or plastic boot (some layouts place it farther back). Trace the thick ignition lead to find it.
2. Clean around the plug before touching it.
Use a brush, towel, or compressed air to remove grass dust and grit. This prevents debris from falling into the plug hole when the plug comes out.
3. Disconnect the spark plug lead (boot).
Grab the boot (not the wire) and pull straight off. Twisting gently can help if it’s stuck.
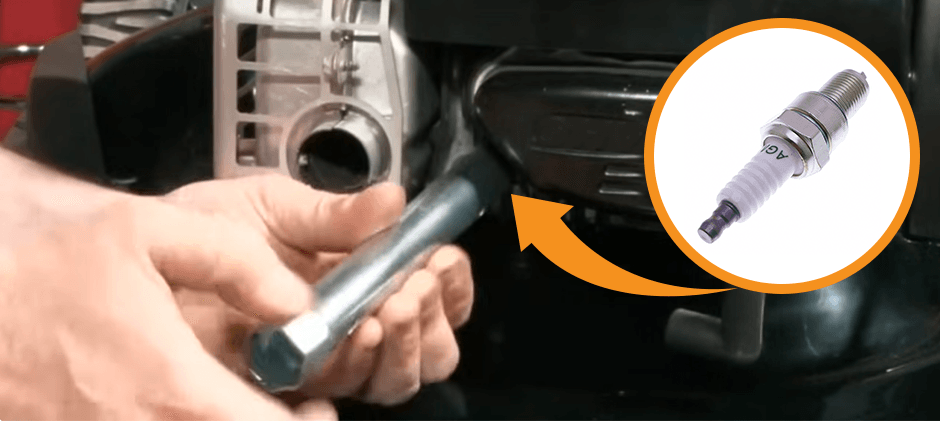
4. Seat the spark plug socket fully.
Push down until it’s fully engaged. A half-seated socket can crack ceramic or round the hex.
5. Loosen counterclockwise—slow and steady.
If it loosens smoothly, keep going until it’s free.
6. If it won’t loosen, don’t force it.
Forcing a stuck plug can strip threads in the head. Instead:
- Apply a tiny amount of penetrating oil at the base (avoid flooding the area).
- Wait a few minutes.
- Try again with steady pressure.
If it still won’t move, stop and avoid damage—thread repair is far more work than plug replacement.
7. Finish by hand.
Once loose, unscrew the plug by hand and lift it out.
How to Check Spark Plugs on a Lawn Mower?
A good check includes (1) a visual read, (2) a gap check, and (3) a decision: reinstall, clean, or replace.
1) Visual inspection: what to look for
Hold the plug under good light and inspect:
- Ceramic insulator: cracks, chips, tracking marks
- Electrodes: worn/rounded edges, heavy deposits
- Threads and sealing area: damage, cross-thread marks
- Color and deposits at the tip: clues about combustion
2) Check the spark plug gap
FridayParts notes typical plug gap ranges around 0.5 to 1 mm (engine-dependent). The correct gap for your mower engine should come from the operator/service info for that engine.
How to check the gap:
- Use a feeler gauge/gap tool between the center electrode and ground strap.
- Compare to your engine spec.
- Adjust carefully if the plug is still in good shape.
Important: If electrodes are worn (rounded, thinned), adjusting the gap won’t “restore” the plug. Replace it.
3) Decide: clean, reinstall, or replace
Use this simple rule set:
- Replace if you see cracked ceramic, burned/worn electrodes, damaged threads, or heavy deposits.
- Clean only if the plug is structurally fine and fouling is light-to-moderate.
- Reinstall if it’s clean, undamaged, and the gap is correct.
Transition: If the inspection says the plug is due, the next question is “why bother changing it?” On mowers, the answer is not just starting—it’s fuel, power, and cutting quality.
Why Is It Important to Change Spark Plugs on a Lawn Mower?
A mower engine depends on consistent ignition to keep RPM stable under load. When plugs wear or foul, the spark can weaken, misfire rises, and the mower loses torque right when the deck needs it most.
What a fresh plug helps you avoid
- No-start situations during peak mowing weeks
- Rough running that stresses the mounts and linkages
- Fuel waste from incomplete burning
- Power loss that shows up as bogging or uneven cut quality
- Harder starting effort (more pulls/cranks)
FridayParts’ mower FAQ guidance commonly recommends replacing plugs every season or after about 25–50 hours of use, and replacing sooner if hard starts or rough operation appear. That schedule is practical for many mowers because the work environment (dust, heat cycles, vibration) is harsh.
Mid-Job Parts Tip
If the plug you removed is damaged, worn, or the wrong spec, it’s usually smarter to replace it than to keep cleaning and rechecking. For a direct fit catalog focused on mowing equipment, start with the lawn mower spark plug selection so you can match your engine’s requirements (size, heat range, and gap spec).
If you’re maintaining more than one type of off-road machine (mowers, small tractors, forklifts, utility equipment), the broader spark plug category can help you cross-shop ignition parts by engine or application.
Transition: After parts are sorted, installation quality matters. Many repeat issues come from cross-threading, over-tightening, or forgetting a basic check.
Related Lawn Mower Maintenance
Spark plugs often foul because other maintenance is overdue. A fast “keep it running” checklist:
- Keep the air filter clean (dirty intake can push the mixture rich)
- Use clean fuel and store fuel properly between seasons
- Keep cooling fins and shrouds clear (overheating can damage plug tips)
- Maintain blade sharpness (reduces load spikes and vibration)
When a mower is in for service, it’s often efficient to bundle tune-up items. FridayParts lists a wide inventory of mower parts (filters, fuel pumps, starter solenoids, starters, belts, blades, and more), so a single maintenance session can fix the root cause—not just the symptom.
Conclusion
Removing a lawn mower spark plug is a simple job, but doing it cleanly and carefully prevents thread damage and keeps debris out of the cylinder. Inspect the plug for deposits, cracks, and electrode wear, then confirm the gap before reinstalling. For many mowers, replacing the plug every season or around 25–50 hours helps prevent hard starts and rough running. When replacement is needed, choosing the correct spec keeps your lawn mower reliable all season.