
The carburetor in your Honda lawn mower plays a crucial role in maintaining engine performance. Just like the human heart pumps blood to sustain life, a lawn mower carburetor mixes air and fuel in the correct ratio for combustion. This combustion powers the engine, enabling the mower to operate efficiently. Without a functioning carburetor, your mower would either fail to start or run poorly. One of the most important processes in maintaining a well-functioning lawn mower is cleaning it regularly. Generally speaking, the best time to clean your carburetor is at the end of each mowing season. This helps remove accumulated dust, dirt, and fuel residue that could affect performance. If you don’t know how to clean it right, this comprehensive guide will help you understand how to clean a Honda lawn mower carburetor effectively.
Common Signs of a Dirty Carburetor in Honda Lawn Mowers
As North America steps into later falls and the winter is coming soon, your Honda lawn mower will rest for a long while, it is time to clean your carburetor. Besides seasonal considerations, how do I tell if my Honda lawn mower needs cleaning? Are there common signs of a Dirty carburetor? Yes, you can have the answer if you find the following common signs:
- Engine surging or stalling: If your mower struggles to maintain a steady RPM, it is a strong sign of a dirty carburetor.
- Difficulty starting: Repeated cranking with no result often indicates a clogged lawn mower carburetor.
- Loss of power during operation: A dirty carburetor can restrict fuel flow, reducing efficiency.
- Black smoke from the exhaust: This could mean the carburetor is delivering too much fuel.
How to Clean a Honda Lawn Mower Carburetor? A Detailed Step-by-Step Guide
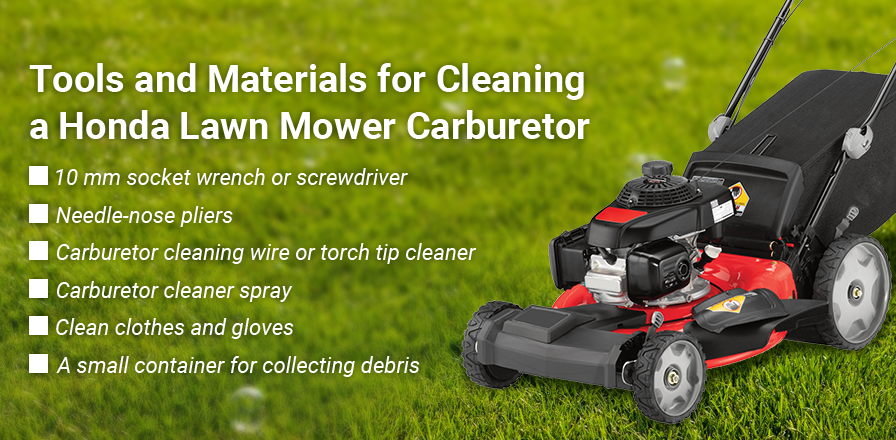
Essential Tools and Materials for Cleaning a Honda Lawn Mower Carburetor
Before you start cleaning, gather the following tools and materials at your disposal:
- 10 mm socket wrench or screwdriver
- Needle-nose pliers
- Carburetor cleaning wire or torch tip cleaner
- Carburetor cleaner spray
- Clean clothes and gloves
- A small container for collecting debris
Step 1: Prepare Your Lawn Mower
- Turn off the fuel: Remember to locate the fuel valve and switch it off to prevent spills.
- Remove the air filter: Use a 10 mm socket to unscrew and remove the bolts securing the air filter. Set the filter aside.
Step 2: Remove the Carburetor
- Access the carburetor: With the air filter assembly removed, you’ll see the carburetor and automatic choke system.
- Detach the fuel line: Use pliers to carefully remove the fuel line without damaging it. Tilt the carburetor back and forth to fully disconnect it.
- Take out the carburetor: Remove any remaining connections and pull the carburetor out for cleaning.
Step 3: Disassemble the Carburetor
- Unscrew the bowl: Remove the bottom bowl of the carburetor by unscrewing the bolt and holding it in place.
- Locate the idle circuit: Identify the tiny passage that controls the idle circuit, which is likely clogged.
Step 4: Clean the Carburetor
- Use a cleaning wire: Insert a thin wire, such as a torch tip cleaner, into the clogged idle circuit. Be patient and carefully work it through.
- Spray carb cleaner: Apply carb cleaner into the circuit and other passages. Ensure the cleaner flows through all openings.
- Clean the main jet: Use a slightly larger cleaning wire to remove any buildup in the main jet. Be gentle to avoid damaging the brass components.
- Verify flow: Check that the passages are clear by observing a steady drip of carb cleaner. Repeat cleaning as necessary until the flow improves.
Step 5: Reassemble the Carburetor
- Reattach the bowl: Once cleaned, screw the fuel bowl back onto the carburetor.
- Reconnect components: Attach the carburetor to the fuel line and throttle connections. Ensure the breather tube and gaskets are in place.
- Secure bolts: Hand-tighten the bolts and then use a socket to secure them fully. Avoid over-tightening.
Step 6: Reinstall the Carburetor
- Align the carburetor: Position it correctly on the engine mount.
- Reconnect the fuel line: Secure the fuel line with clamps.
- Reassemble the air filter: Replace the air filter assembly and tighten the bolts.
Step 7: Test the Lawn Mower
- Turn on the fuel: Open the fuel valve and allow the carburetor to fill.
- Start the engine: Take the mower outside and start it.
- Check for smooth operation: Ensure it runs smoothly at full throttle and idle.
I believe after cleaning, your Honda lawn mower will run smoothly next spring without surging or stalling. Proper maintenance of the carburetor will keep your mower in excellent condition for seasons to come!
How to Identify Clogs in the Idle Circuit and Main Jet?
It is also a frequently asked question when speaking about carburetor cleaning. The idle circuit and main jet are common areas for blockages. Once the carburetor is removed, you should inspect the idle circuit, if you see some fuel residue or dirt around the small screw, it is a sign of clogs. Also, don’t forget to check the main jet. Use a carburetor cleaning wire to probe through the jet for obstructions.
Conclusion
Cleaning your Honda lawn mower carburetor regularly is vital for maintaining peak performance and extending its lifespan. By following this guide, you’ll not only prevent common issues like surging and stalling but also save money on repairs. Always clean the carburetor at the end of each mowing season to ensure it’s ready for the next. Regular maintenance guarantees smooth, hassle-free operation and keeps your Honda lawn mower running like new.
FridayParts cares about lawn care and lawn mower repairs and upgrades. We take part in many lawn care communities and we offer cost-effective lawnmower solutions for a wide range of brands. You can find quality Honda, Bobcat, Bad Boy, Husqvarna, Kubota, and more brands parts here. Our experts are happy to give lawn care suggestions and mower upgrade advice, contact us if you need any help.