
The PTO is necessary for your tractor, and mastering the tractor PTO shafts is key to your harvest efficiency, but how do you choose the right length ones? It’s a tricky problem. Here are mainly two methods: one is measuring the PTO shaft in advance; the other is cutting it to your ideal length. And you also need to know the shortest working length and the longest working length. And you also need to know the shortest working length to prevent damage. This guide will have you covered, learn now!
How Do I Know What Diameter PTO Shaft I Have?
This is the number one question that trips people up. You see two common sizes: 1-1/8″ and 1-3/8″. You measure your tractor’s output shaft and get two different numbers, leaving you confused.
Here is the simple answer:
The industry standard measurement for a PTO shaft’s diameter is taken from the top of one spline to the top of the opposite spline.
- If you measure from the outside of one spline to the outside of the opposite spline and get 1-3/8 inches, you have a 1-3/8″ shaft. This is the standard for almost all tractors made after the mid-1950s.
- If you measure the smooth, round part of the shaft (between the splines) and get 1-1/8″, that’s not the correct measurement. The true size is still 1-3/8″.
A Simple Rule of Thumb: If your tractor is a Ford 640, a Kubota L2501, or almost any modern tractor, you have a 1-3/8″ x 6-spline PTO shaft. The smaller 1-1/8″ size is found only on very old tractors, like the Ford 8N or Ferguson “N” series. If you’re unsure, think “Hefty vs. Wimpy.” The 1-3/8″ shaft looks noticeably more robust.
How to Measure a PTO Shaft for Correct Length
This is the most important safety step. The goal is to find the shortest distance the shaft will ever be during operation and ensure it doesn’t “bottom out” (compress completely). A bottomed-out shaft will destroy the gearboxes on your tractor and implement.
Safety First: Before you begin, turn off your tractor, remove the key, and make sure the implement is securely on the ground.
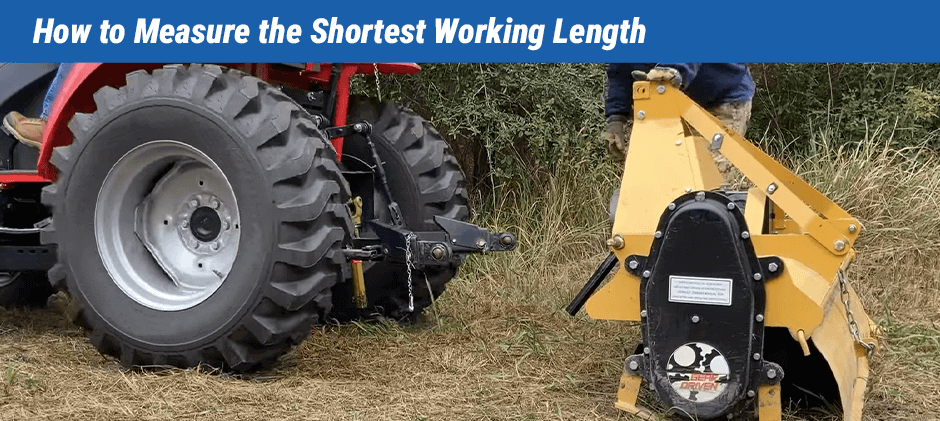
Step 1: Attach the Implement and Find the “Binding Point”
Connect your implement to the tractor’s three-point hitch. Do not attach the PTO shaft yet.
Now, slowly raise and lower the implement through its entire range of motion, from the lowest position to the highest. While doing this, use a tape measure to check the distance between the tractor’s PTO output and the implement’s input shaft at several points. Your goal is to find the position where this distance is the absolute shortest. This is your critical measurement position. Stop and secure the tractor at this point.
Step 2: Measure the Working Distance
Using a tape measure, measure the distance from the locking groove on the tractor’s output shaft to the locking groove on the implement’s input shaft. Write this number down. This is your “Shortest Working Length.”
Step 3: Calculate Your Target Cutting Length
You need a safety margin. Subtract 2 inches (or 5 cm) from your “Shortest Working Length.” The new number is your target “Maximum Compressed Length.” This is the longest your PTO shaft should be when it is fully pushed together.
What If I Use a Quick Hitch? The “QH-15 Problem”
Many users have their dealer cut their PTO shafts to work with a quick hitch (like a QH-15). A quick hitch pushes the implement further away from the tractor.
- The Problem: If you remove the quick hitch and attach the implement directly, your PTO shaft may now be too long.
- How to Check: Follow the measurement steps above with the implement attached directly (no quick hitch). Ensure your current PTO shaft is shorter than the “Maximum Compressed Length,” or it must be cut shorter.
How to Cut a PTO Shaft for a Wanted Length
If you’ve determined your new or existing shaft is too long, you need to cut it. Before you start, you’ll first need to know how to remove the PTO shaft from both the tractor and the implement. Once removed, don’t be intimidated; with the right tools, it’s a straightforward job.
Tools You Will Need:
- A hacksaw or angle grinder with a cutting disc
- A tape measure and a permanent marker
- A metal file or deburring tool
- Safety glasses and gloves
Step 1: Separate and Calculate
Pull the two halves of the PTO shaft apart. Push them completely together and measure the total compressed length.
(Current Compressed Length) – (Your Target “Maximum Compressed Length”) = Total Amount to Remove
Crucially, you must cut this amount from EACH half of the shaft. For example, if you need to remove 4 inches total, you must cut 4 inches from the inner tube AND 4 inches from the outer tube.
Step 2: Mark and Cut the Metal Tubes
Carefully mark the amount to cut from the ends of both the inner and outer metal tubes. Double-check your marks! Wearing safety gear, cut both tubes as straight as possible.
Step 3: Cut the Plastic Guards
The plastic safety guards must also be shortened. Mark and cut the same amount from each plastic guard that you removed from its corresponding metal tube. For example, if you cut 4 inches off the outer metal tube, cut 4 inches off the outer plastic guard.
Step 4: Deburr, Clean, and Lubricate
This is a critical step. Use a file to smooth all sharp edges and burrs from the cuts on the metal tubes until it gets smooth. A smooth, beveled edge will make reassembly much easier. Then, apply a generous amount of grease to the inner tube.
Step 5: Reassemble and Test
If you’ve done it right, the PTO shaft can slide.
Final Thoughts
Finally, you must test your newly cut PTO shaft on your tractor to make sure it’s a perfect fit.
- Attach the shaft, turn off the engine, and put the tractor in neutral.
- Slowly raise and lower the implement through its full range of motion.
- At several points (lowest, middle, and highest), try to rotate the PTO shaft by hand. It should spin freely without binding or getting tight at any point.
By following these safe and correct steps, you can confidently choose, measure, and cut your PTO shaft. By the way, FridayParts offers top-quality and cost-effective PTO shafts to make you choose and cut. Explore our whole catalog and order today!