
The battery reads 12 V, the dash lights up, yet the engine doesn’t crank. What’s the problem? Before tearing down your starter or ordering expensive parts, the starter relay (also called a solenoid) should be on your suspect list.
Bypassing it is a safe, practical way to tell whether the relay or another part of the starting circuit is failing. This guide combines an easy‑to‑follow diagnostic checklist.
Safety First
Working around live high‑current circuits can be risky. Always follow these steps before doing anything:
- Place the transmission in PARK / NEUTRAL.
- Set the parking brake and block the wheels.
- Disengage PTO or any attachments.
- Work in a ventilated area away from fuel vapors.
- Wear insulated gloves and eye protection.
- Expect sparks when bridging terminals — this is normal, but handle tools carefully.
Rule Out the Basics
Most “dead‑click” issues are not the relay itself. Run through this quick pre‑check first:
- Battery health: 12.6 V at rest ≠ healthy under load. Have it load‑tested. A weak battery may show good voltage but lack amperage.
- Cables and grounds: Clean all battery clamps and the frame ground point until shiny metal shows. Corrosion often hides under “okay‑looking” terminals.
- Fuses & safety switches: Check neutral‑position, seat, or PTO switches for continuity. A broken switch can stop current before it ever reaches the relay.
Only after confirming these basics should you test the relay itself.
Identify Your Type of Starter Relay
Your machine will have one of two systems:
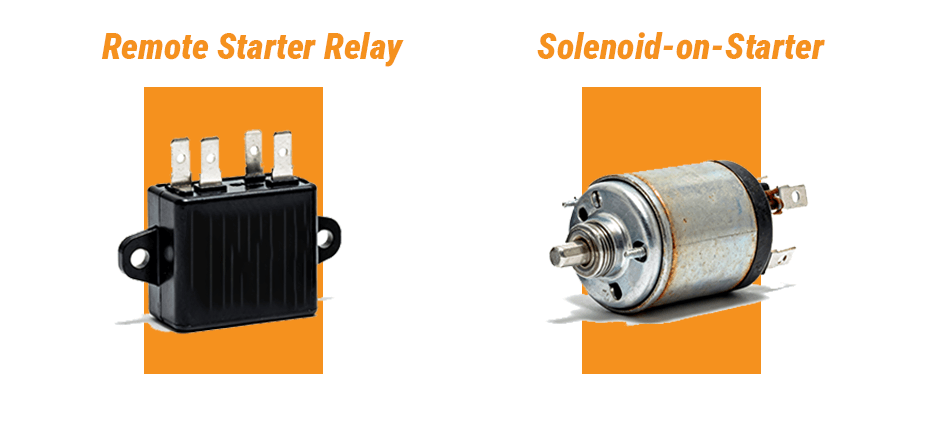
Type A – Remote Starter Relay
- A separate small box, often on the firewall.
- Two large posts (battery + to starter), one or two smaller signal posts (“S” or “I”).
- Found in many older or Ford‑style systems.
Type B – Solenoid‑on‑Starter
- Small cylinder mounted directly on the starter motor.
- One heavy cable from the battery and one small spade terminal from the ignition switch.
- Common on modern tractors and equipment.
Bypassing Methods
Method 1 – Remote Starter Relay (Type A)
Goal: Send battery power straight to the starter motor.
Tools: Insulated screwdriver or heavy jumper wire.
- Turn ignition key to ON/RUN (not START).
- Bridge the two large posts on the relay for 1–2 seconds.
- If the engine cranks strongly, it proves the battery, main cables, and the starter motor itself are working correctly. The fault likely lies within the relay or the control circuit that activates it.
- Expert Tip: Never jump wires based on generic guides or specific vehicle wire colors. Always refer to your equipment’s service manual to identify the correct terminals.
Method 2 – Starter‑Mounted Solenoid (Type B)
Goal: Trigger the solenoid manually.
- Key to ON.
- Touch a screwdriver or jumper from the large battery terminal to the small signal terminal on the solenoid.
- Expect sparks; hold briefly.
If the engine cranks, your issue lies in the ignition switch, safety circuit, or the relay control wiring — not in the starter motor.
Reading the Results
| Observation | Interpretation | Action |
|---|---|---|
| Cranks during bypass | The starter motor, main cables, and battery are working correctly. The fault is in the relay itself or its control circuit (ignition switch, safety switches, related wiring). | Replace the relay or trace the control circuit |
| Only clicks / no crank | The battery is too weak under load, a main cable/ground has high resistance, or the starter motor itself has failed. | Test for voltage drop; inspect starter |
| Nothing at all | No power is reaching the circuit you are testing. | Re‑check main feeds, fuses, and grounds |
Mechanic insight (from Reddit):
“If it cranks but only clicks with the key, check the control side of the relay — ignition power or ground fault may be the cause.”
Common Hidden Issues from Real Technicians
- Oxidised battery cables: Appear fine visually but have degraded internal strands — replace if stiff or corroded.
- Blowing a 10 A fuse in unrelated circuits (like the O₂ sensor or safety interlock) can interrupt the start signal.
- Intermittent ground at the relay bracket itself. Clean and retighten the mounting screws.
- Weak ignition switch: Older switches may not deliver full voltage to the relay coil.
Smarter Testing & Upgrades
- Use a remote starter switch: several MG and Land Rover owners wire one permanently for valve adjustments or compression tests.
- Use a multimeter for precise diagnosis: Instead of guessing, use a multimeter to test the control circuit. With an assistant turning the key to “START”, check for 12V at the relay’s signal terminal (the small post or “S” terminal). If there is no voltage, the problem is upstream in the ignition switch or safety circuits. If there is 12V but the relay doesn’t activate, the relay itself is likely faulty.
- A high-current starter relay CANNOT be replaced with a standard 30/40A cube-style relay. Doing so will cause the small relay to melt, creating a fire hazard. Always use a replacement relay with the same or higher amperage rating as the original.
Fix and Re‑Test
If your bypass test confirms that the starter relay is faulty, the fix is thankfully quick and budget‑friendly.
Before installing the new unit:
- Clean all terminals thoroughly to remove oxidation or debris — a clean contact ensures maximum current flow.
- Tighten the connectors to firm, secure torque (loose connections can recreate the same intermittent issues).
After installation, turn the key and listen for a smooth, confident crank — that’s your signal the problem is resolved.
Need a durable replacement?
Check out starter relays and high‑quality electrical components from FridayParts, purpose‑built for heavy equipment reliability. Their precise fit and tested performance mean you can get back to work faster and start your machine with confidence every time.
Quick Takeaways
- Bypass safely: connect battery power only momentarily.
- If it cranks: it’s a relay or key switch problem.
- If no crank: starter, cable, or battery fault.
- Corrosion and poor grounds cause most “new relay, still clicks” mysteries.
- Testing saves time — replacing blindly wastes it.