
Is your car’s AC not blowing as strongly as it used to? Are you noticing unpleasant odors inside your vehicle? If so, it is time to replace your cabin air filter. Replacing a cabin air filter can be done completely by yourself. It is an easy DIT task that improves your vehicle’s air quality and HVAC system efficiency. In this guide, I will break this action down into 5 simple steps. Don’t worry, you will find everything you need to know about cabin air filters, from what they are, when to replace a cabin air filter, and what tools you need to have. Let’s get ready!
What is a Cabin Air Filter and Why Replace It?
A cabin air filter is a vital component of your vehicle’s HVAC system. It traps contaminants like dust, pollen, mold, and other airborne particles before they enter your car’s interior. So over time, the filter itself becomes clogged, reducing airflow and causing bad odors. There are certain benefits if you replace your cabin air filter on time:
Cleaner air inside your car – Reduces allergens and pollutants.
Better HVAC performance – Ensures strong airflow and prevents strain on the system.
Eliminates bad odors – Removes musty smells caused by trapped dirt and moisture. Prevents window fogging – Helps maintain proper air circulation and visibility.
When to Replace a Cabin Air Filter? 4 Must-Know Signs!
Most manufacturers recommend the best time to replace the cabin air filter every 12,000 to 15,000 miles or at least once a year (which comes first). However, time and driving miles are not the only criteria that help you make a wise judgment. Here are 4 significant signs indicating an immediate replacement:
- Weak airflow from vents – If your AC or heater isn’t blowing as strongly, a clogged filter may be restricting airflow.
- Bad odors inside the car – A dirty filter can trap mold, mildew, and bacteria, causing unpleasant smells.
- Increased allergy symptoms – If you’re sneezing or experiencing itchy eyes while driving, the filter may no longer be effective at trapping allergens.
- Noisy HVAC system – A clogged filter forces the system to work harder, causing unusual noises.
If you notice any of these symptoms, it’s time to replace your cabin air filter!
Cabin Air Filter Replacement Tools & Materials List
A job well begun is a job half done—grab the right tools, and you’re off to a smooth start.
- New cabin air filter (FridayParts covers a wide range of quality cabin air filters. You can find the best deals with our clearance options. Check your owner’s manual for the correct size and type)
- Screwdriver (if necessary for removal)
- Gloves (optional, to keep your hands clean)
- Vacuum or microfiber cloth (for cleaning the filter housing)
Step-by-Step Guide to Replace a Cabin Air Filter
Replacing your cabin air filter is a straightforward process that usually takes 10-15 minutes. Follow these steps:

Step 1: Locate the Cabin Air Filter
The cabin air filter is usually hidden in one of three common locations: behind the glove box, under the dashboard, or under the hood near the windshield. The most typical placement is behind the glove box, where manufacturers make it easily accessible. However, if you’re unsure, checking your owner’s manual will give you the exact location for your vehicle model.
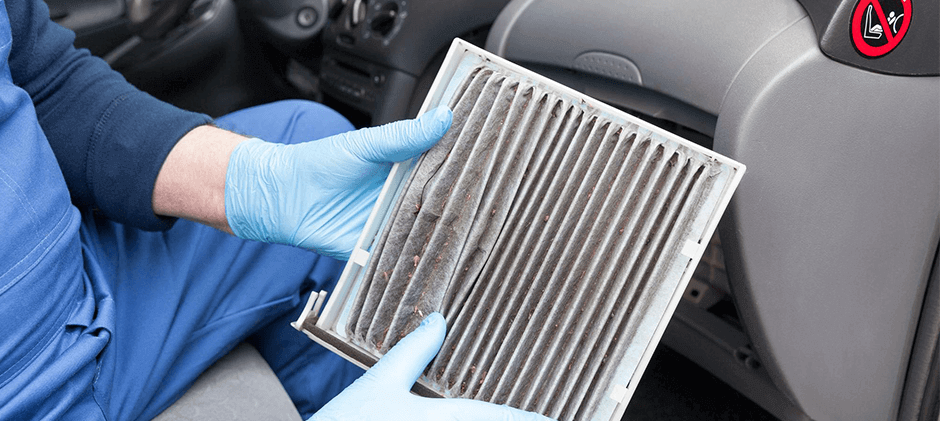
Step 2: Remove the Old Cabin Air Filter
Once you’ve located the filter, begin by opening the glove box and clearing out any items inside. In some vehicles, you may need to detach the glove box by removing screws or clips before reaching the filter compartment. Next, find the filter cover and carefully unclip or unscrew it. Once the cover is off, gently slide out the old filter, taking note of its orientation to ensure proper installation of the new one. You may notice visible dirt, dust, or debris trapped in the filter, confirming it’s time for a replacement.
Step 3: Clean the Filter Housing
Before inserting the new filter, take a moment to clean the filter compartment. Dust, leaves, and small debris often accumulate in this area. Using a vacuum or a microfiber cloth, remove any visible dirt to prevent it from clogging the new filter prematurely. A clean housing ensures better airflow and maximizes the effectiveness of the new filter.
Step 4: Install the New Cabin Air Filter
Now, take your new cabin air filter and align it correctly with the airflow direction arrows printed on the side. These arrows should match the ones indicated inside the housing, ensuring that air moves through the filter in the intended direction. Gently slide the filter into place, making sure it fits snugly within the compartment. Once secured, reattach the filter cover and, if necessary, reinstall the glove box by snapping it back or fastening the screws.
Step 5: Test the System
After installation, turn on your car’s AC or heater to test airflow. If everything is done correctly, you should immediately notice improved airflow and fresher air circulation inside your vehicle. Take a deep breath and enjoy the clean air, knowing your car’s HVAC system is now working more efficiently!
Explore More Cabin Air Filters

FAQs About Cabin Air Filter Replacement
How Much Does It Cost to Replace a Cabin Air Filter?
A replacement filter typically costs $10-$50, depending on the brand and type. If you choose to have it replaced at a dealership, labor costs can add another $30-$70. If you come and buy at FridayParts, you will only find the most cost-effective solutions for cabin air filter replacement. View more FridayParts cabin air filter collections.
How to Choose the Best Cabin Air Filter?
Read: Ultimate Best Cabin Air Filters Buying Guide
Conclusion
I believe with the detailed replacement guide, you are ready to get your hands dirty! Replacing an air filter in your cabin is a small step, but it can significantly improve your driving experience. With this easy DIY guide, you can swap out your old filter in just a few minutes, saving money on professional services. If you find this article useful, don’t forget to share it on your social platforms with your families and friends. Follow FridayParts anbookmark our website FridayParts.com for faster access and more practical parts suggestions!